In this post, we will see how to install longhorn into your Kubernetes cluster. If you are not familiar with longhorn block storage, it is a production-ready block storage solution specially designed for Kubernetes. you can install longhorn on any managed Kubernetes cluster, on-prem, or even in your home lab. It is a lightweight solution for managing all the dynamic volume provisioning in the cluster. This means, that with longhorn as the default storage class the dynamic volume creation is super easy. I would probably call it simplest to install and manage block storage for Kubernetes. It can be managed by a super clean and intuitive dashboard.
The longhorn is designed for Kubernetes, in the Kubernetes world, pods are typically created in multiple replicas. Similarly, with longhorn, the volumes created are also replicated. This means, there is no single point of failure. Even with multiple nodes failing, the volume would remain up. You can choose the number of replicas of a volume, to prevent data loss. Using this for databases is an important use case for longhorn.
PS: I will do the installation in my home lab, but the procedure is applicable to all the other kinds of environments.
Initial state: I am running a four-node(1 Controller, three worker nodes) with no storage class
kubectl get node -o wide
NAME                STATUS   ROLES                  AGE   VERSION   INTERNAL-IP     EXTERNAL-IP   OS-IMAGE             KERNEL-VERSION      CONTAINER-RUNTIME
kube-controller-1   Ready    control-plane,master   8d    v1.23.7   192.168.1.156   <none>        Ubuntu 20.04.3 LTS   5.4.0-117-generic   containerd://1.6.4
kube-worker-1       Ready    <none>                 8d    v1.23.7   192.168.1.157   <none>        Ubuntu 20.04.3 LTS   5.4.0-117-generic   containerd://1.6.4
kube-worker-2       Ready    <none>                 8d    v1.23.7   192.168.1.158   <none>        Ubuntu 20.04.3 LTS   5.4.0-117-generic   containerd://1.6.4
kube-worker-3       Ready    <none>                 8d    v1.23.7   192.168.1.155   <none>        Ubuntu 20.04.3 LTS   5.4.0-117-generic   containerd://1.6.4


kubectl get storageclasses.storage.k8s.io
No resources found

My configuration for this post, tweak this as per your requirements
- I will NOT install longhorn on my controller node for this post. I will only install longhorn on the worker nodes to save the controller from additional stress.
- I will use three replica counts per volume. This is also the default value.
- I will change the service type of the longhorn dashboard from ClusterIP to NodePort to access it via a web browser.
step-1: Check for the dependencies and pre-requisites for longhorn in your cluster
Download the official script from longhorn and run the script to check whether the dependencies are satisfied or not in your cluster. The problem with this script is that it works incrementally and will only show one dependency missing during a run. Once you fix and rerun it, the script will show other missing dependencies.
#download the script to check env
wget https://raw.githubusercontent.com/longhorn/longhorn/v1.3.0/scripts/environment_check.sh
The script will spit out the errors for every dependency needed for longhorn. Therefore, you must install all the dependencies and ensure this script throws no error before moving forward.
bash environment_check.sh
[INFO]  Required dependencies are installed.
[INFO]  Waiting for longhorn-environment-check pods to become ready (0/0)...
[INFO]  Waiting for longhorn-environment-check pods to become ready (2/4)...
[INFO]  All longhorn-environment-check pods are ready (4/4).
[INFO]  Required packages are installed.
[INFO]  MountPropagation is enabled.
[INFO]  Cleaning up longhorn-environment-check pods...
[INFO]  Cleanup completed.
Step-2: Resolve the errors shown in the above output by installing dependencies
You would likely see errors for nfs-common not being installed in your nodes and iscsid not running in your node. If you get those errors, you can run the following commands on all the nodes.
sudo apt install nfs-common -y
sudo systemctl enable iscsid
I will do an environment check again with the script downloaded in the first step. You should get the blessing to move ahead if there are no more errors.
Step-3: Install longhorn using helm
There are multiple ways to install longhorn, but I prefer using helm. If you wish not to use helm due to some reasons, you can find other alternatives at the following link:
https://longhorn.io/docs/1.3.0/deploy/install/
Step-3A: Add longhorn helm repo
helm repo add longhorn https://charts.longhorn.io
"longhorn" has been added to your repositories
Step-3B: Update the helm repo to reflect the latest changes
 helm repo update
Hang tight while we grab the latest from your chart repositories...
...Successfully got an update from the "longhorn" chart repository
...Successfully got an update from the "falcosecurity" chart repository
...Successfully got an update from the "fluent" chart repository
...Successfully got an update from the "armo" chart repository
...Successfully got an update from the "elastic" chart repository
...Successfully got an update from the "jetstack" chart repository
...Successfully got an update from the "jenkinsci" chart repository
...Successfully got an update from the "bitnami" chart repository
...Successfully got an update from the "deliveryhero" chart repository
Update Complete. ⎈Happy Helming!⎈


helm search repo longhorn  --max-col-width 80
NAME             	CHART VERSION	APP VERSION	DESCRIPTION
longhorn/longhorn	1.3.0        	v1.3.0     	Longhorn is a distributed block storage system for Kubernetes.
Step-3C: Customization as per my environment, tweak as per your environment
helm show values longhorn/longhorn > longhorn_values.yml- I will make UI service as NodePort type over port 30090
- To exclude the controller node from longhorn installation, I will taint the controller node using the below command (in my case, it was already tainted).
Alternatively, you can set the labels for each node and leverage the node selector in values.yml to exclude the installation.
kubectl taint node kube-controller-1 node-role.kubernetes.io/master=true:NoSchedule
Following are the few crucial attributes of the values.yml worth highlighting; you may skip making modifications to any of these values if you want to proceed with default values. However, there are many more attributes like resources request and limits in the value.yml, which you may find interesting for your environment. Feel free to update those as per your requirements. you can use helm upgrade to tweak the values after the upgrade. OR modify the things from the dashboard, I would prefer using helm upgrade to keep things unform and easy to track via code.
| Attribute | Values used in this post |
| By default, the UI of longhorn will be of ClusterIP, which is accessible via port-forwarding. If you wish to make it NodePort or anything else, this is the attribute you may change. | service: ui: type: NodePort nodePort: 30090 |
| The values on the right column: make longhorn the default storage class FS type set to ext4, The desired replica count to 3. Reclaim Policy to delete. If you wish to update any values, you can update the file. | persistence: defaultClass: true defaultFsType: ext4 defaultClassReplicaCount: 3 defaultDataLocality: disabled reclaimPolicy: Delete |
| Ingress can be enabled, but for that, there are additional fields that need to be configured. Like TLS, hostname, etc. | ingress: enabled: false |
| Node selector may be used to install longhorn selectively. I have used taint to prevent touching the controller node. But you can further customize the behavior here. | longhornManager: nodeSelector: {} longhornDriver: nodeSelector: {} longhornUI: nodeSelector: {} |
Step-3D: Perform helm install with your values.yml
helm install longhorn longhorn/longhorn --namespace longhorn-system --create-namespace -f longhorn_values.ymlStep-4: Validate that installation is completed
Run the below command to dump the status of all the pods, services, and deployments running in the longhorn-system namespace. All of the pods should be in a Running and READY state.
kubectl get pod -n longhorn-system
kubectl get deployments.apps -n longhorn-system
kubectl get daemonsets.apps -n longhorn-system


#notice the longhorn-frontend service is of type NodePort and listning over 30090
kubectl get svc -n longhorn-system
NAME                          TYPE        CLUSTER-IP      EXTERNAL-IP   PORT(S)        AGE
csi-attacher                  ClusterIP   10.233.15.100   <none>        12345/TCP      11m
csi-provisioner               ClusterIP   10.233.26.14    <none>        12345/TCP      11m
csi-resizer                   ClusterIP   10.233.44.193   <none>        12345/TCP      11m
csi-snapshotter               ClusterIP   10.233.46.8     <none>        12345/TCP      11m
longhorn-admission-webhook    ClusterIP   10.233.33.185   <none>        9443/TCP       11m
longhorn-backend              ClusterIP   10.233.13.132   <none>        9500/TCP       11m
longhorn-conversion-webhook   ClusterIP   10.233.34.138   <none>        9443/TCP       11m
longhorn-engine-manager       ClusterIP   None            <none>        <none>         11m
longhorn-frontend             NodePort    10.233.1.121    <none>        80:30090/TCP   11m
longhorn-replica-manager      ClusterIP   None            <none>        <none>         11m
It would be best if you also verified that a bunch of CRD is created in the cluster.
kubectl  get crd -owide|grep -i longhorn
backingimagedatasources.longhorn.io                   2022-06-15T21:23:00Z
backingimagemanagers.longhorn.io                      2022-06-15T21:23:00Z
backingimages.longhorn.io                             2022-06-15T21:23:00Z
backups.longhorn.io                                   2022-06-15T21:23:00Z
backuptargets.longhorn.io                             2022-06-15T21:23:00Z
backupvolumes.longhorn.io                             2022-06-15T21:23:00Z
engineimages.longhorn.io                              2022-06-15T21:23:00Z
engines.longhorn.io                                   2022-06-15T21:23:00Z
instancemanagers.longhorn.io                          2022-06-15T21:23:00Z
nodes.longhorn.io                                     2022-06-15T21:23:00Z
orphans.longhorn.io                                   2022-06-15T21:23:00Z
recurringjobs.longhorn.io                             2022-06-15T21:23:00Z
replicas.longhorn.io                                  2022-06-15T21:23:00Z
settings.longhorn.io                                  2022-06-15T21:23:00Z
sharemanagers.longhorn.io                             2022-06-15T21:23:00Z
snapshots.longhorn.io                                 2022-06-15T21:23:00Z
volumes.longhorn.io                                   2022-06-15T21:23:00Z
Note that a new storage class called longhorn is created and set to the default storage class.
 kubectl  get sc
NAME                 PROVISIONER          RECLAIMPOLICY   VOLUMEBINDINGMODE   ALLOWVOLUMEEXPANSION   AGE
longhorn (default)   driver.longhorn.io   Delete          Immediate           true                   49m
Installation is completed, Proceed with the below tests if you wish to validate your longhorn deployment or you are doing this activity for learning.
TEST-1: Validate Dashboard access
We should be able to access the frontend-ui/dashboard using any node-IP and configured port in values.yml. Using the dashboard is optional if you have already configured the values.yml properly. However, you can view the stats and modify the attributes in the values.yml from dashboard settings.
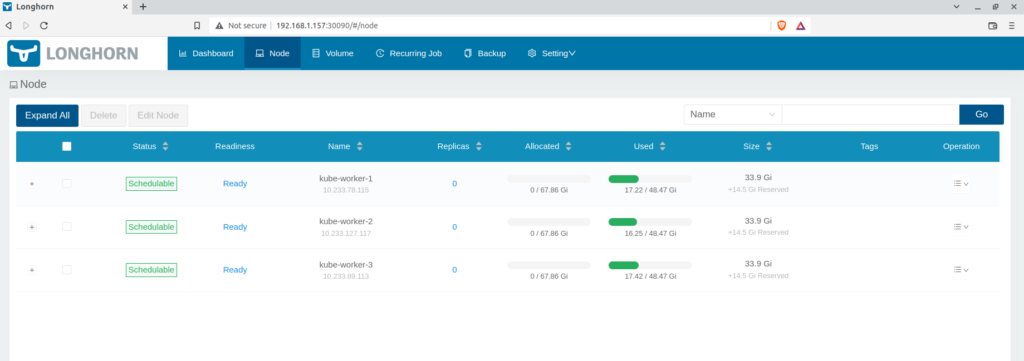
Until now, we have verified that longhorn is running and all the volumes are schedulable.
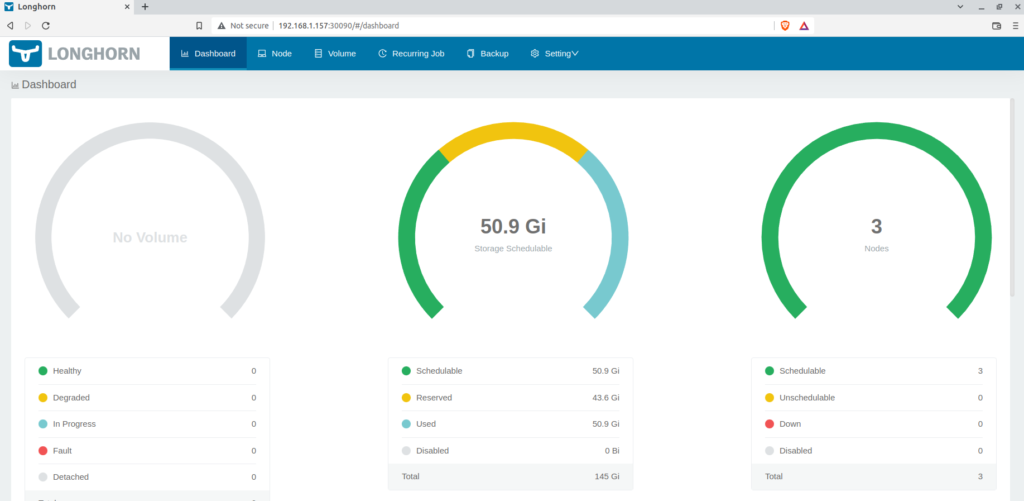
Longhorn dashboard using NodePort, showing three nodes used for replication.
TEST-2: Validate the Automatic volume creation by creating PVC and POD.
Create the PVC called “myclaim” notice we have not used any assigning any storage class here. We want the default storage class to take charge of this PV claim.
cat << EOF | kubectl create -f -
apiVersion: v1
kind: PersistentVolumeClaim
metadata:
  name: myclaim
spec:
  accessModes:
    - ReadWriteMany
  volumeMode: Filesystem
  resources:
    requests:
      storage: 2Gi
EOF
Validate that PVC is created by longhorn storage class
kubectl get pvc
NAME      STATUS   VOLUME                                     CAPACITY   ACCESS MODES   STORAGECLASS   AGE
myclaim   Bound    pvc-69c38b34-81f0-49d8-a0c0-9382d76b3516   2Gi        RWO            longhorn       4m31s
Now create a pod using the above PVC called myclaim. Carefully note the volumeMount is used as /var/foo/.
cat << EOF |kubectl create -f -
apiVersion: v1
kind: Pod
metadata:
  name: mypod
spec:
  containers:
    - name: myfrontend
      image: nginx
      volumeMounts:
      - mountPath: "/var/foo/"
        name: mypd
  volumes:
    - name: mypd
      persistentVolumeClaim:
        claimName: myclaim
EOF
kubectl get pod -owide
NAME READY STATUS RESTARTS AGE IP NODE NOMINATED NODE READINESS GATES
mypod 1/1 Running 4 (11m ago) 4h32m 10.233.127.174 kube-worker-2 <none> <none>
#also note that the PV is automatically created
kubectl get pv
NAME CAPACITY ACCESS MODES RECLAIM POLICY STATUS CLAIM STORAGECLASS REASON AGE
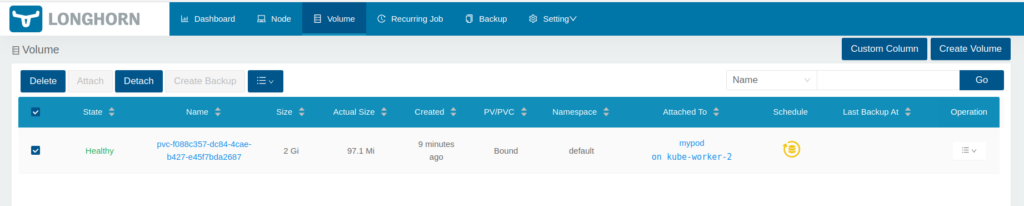
pvc-f088c357-dc84-4cae-b427-e45f7bda2687 2Gi RWO Delete Bound default/myclaim longhorn 167m
The dynamic volume created by the PVC(or by storage class longhorn) is also visible in the dashboard. The snippet below shows that volume “pvc-f088c357-dc84-4cae-b427-e45f7bda2687” is attached to a pod called “mypod.” And the pod is scheduled in the Kube-worker-2 node.
TEST-3: Validate the resilience of the volume used by shutting down the node where pod is scheduled
Let’s create a deployment called “my-deployment” with the Nginx image. That deployment will use the PVC called “myclaim”
cat << EOF |kubectl create -f -
apiVersion: apps/v1
kind: Deployment
metadata:
  creationTimestamp: null
  labels:
    app: my-deployment
  name: my-deployment
spec:
  replicas: 1
  selector:
    matchLabels:
      app: my-deployment
  strategy: {}
  template:
    metadata:
      creationTimestamp: null
      labels:
        app: my-deployment
    spec:
      containers:
      - image: nginx
        name: nginx
        resources: {}
        volumeMounts:
        - mountPath: "/var/foo/"
          name: mypd
      volumes:
      - name: mypd
        persistentVolumeClaim:
          claimName: myclaim
status: {}
EOF
Now shut down the kube-worker-2(the node where mypod pod is scheduled). The pod is scheduled on kube-worker-2.
kubectl get pod -owide
NAME                            READY   STATUS    RESTARTS   AGE   IP               NODE            NOMINATED NODE   READINESS GATES
my-deployment-96c4f78ff-dz2dw   1/1     Running   0          54s   10.233.127.182   kube-worker-2   <none>           <none>
Let’s write some dummy data to the mountPath of the volume from within the cluster. We will use this data later to verify that the data is accessible even when the scheduled node is down.
kubectl exec -it my-deployment-96c4f78ff-dz2dw  -- bash
root@my-deployment-96c4f78ff-dz2dw:/# echo "$(date): log from the nginx container" > /var/foo/bar.log


root@my-deployment-96c4f78ff-dz2dw:/# cat /var/foo/bar.log
Thu Jun 16 21:12:47 UTC 2022: log from the nginx container
root@my-deployment-96c4f78ff-dz2dw:/#
ssh technekey@kube-worker-2 "sudo -S shutdown now"
[sudo] password for technekey:
Connection to kube-worker-2 closed by remote host.


kubectl get node -owide
NAME                STATUS     ROLES                  AGE   VERSION   INTERNAL-IP     EXTERNAL-IP   OS-IMAGE             KERNEL-VERSION      CONTAINER-RUNTIME
kube-controller-1   Ready      control-plane,master   9d    v1.23.7   192.168.1.156   <none>        Ubuntu 20.04.3 LTS   5.4.0-117-generic   containerd://1.6.4
kube-worker-1       Ready      <none>                 9d    v1.23.7   192.168.1.157   <none>        Ubuntu 20.04.3 LTS   5.4.0-117-generic   containerd://1.6.4
kube-worker-2       NotReady   <none>                 9d    v1.23.7   192.168.1.158   <none>        Ubuntu 20.04.3 LTS   5.4.0-117-generic   containerd://1.6.4
kube-worker-3       Ready      <none>                 9d    v1.23.7   192.168.1.155   <none>        Ubuntu 20.04.3 LTS   5.4.0-117-generic   containerd://1.6.4
If you check the dashboard, you will find that node is down.
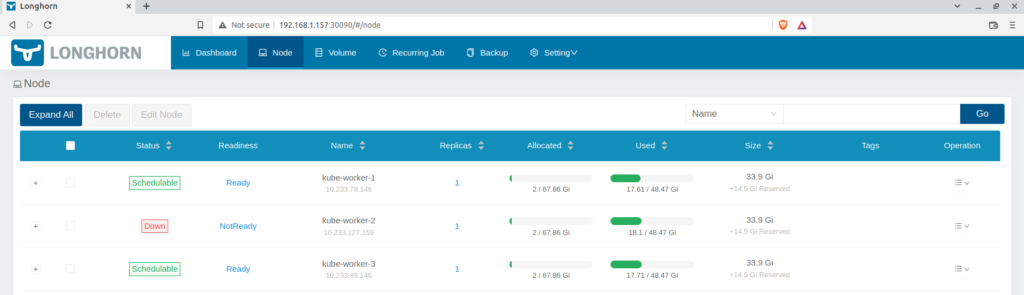
Once the deployment controlled will realize that the node Kube-worker-2 is down causing the pod replica to go down, it will schedule a new pod using the same volume claim. The new pod is running on the node kube-worker-3.
kubectl get pod -owide -w
NAME                            READY   STATUS        RESTARTS   AGE     IP               NODE            NOMINATED NODE   READINESS GATES
my-deployment-96c4f78ff-dz2dw   1/1     Terminating   0          7m57s   10.233.127.182   kube-worker-2   <none>           <none>
my-deployment-96c4f78ff-jtp94   1/1     Running       0          57s     10.233.89.161    kube-worker-3   <none>           <none>
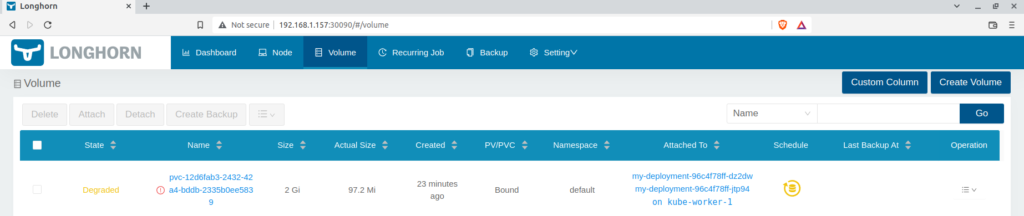
Now let’s check the contents of the volume’s mountPath. You will notice that the data which we wrote earlier from the earlier pod instance is still present even when the node is shut down. This showcase the power and simplicity of the longhorn storage solution.
kubectl exec -it my-deployment-96c4f78ff-jtp94  -- cat /var/foo/bar.log
Thu Jun 16 21:12:47 UTC 2022: log from the nginx container
However, if you would open the dashboard and notice the volume state, it will be in a degraded state. The reason for the degraded state is the current replica count is not equal to the desired replica count (we set during the installation in values.yml)

Summary:
longhorn is a great solution for managing block storage in your Kubernetes cluster. In my opinion, longhorn is the simplest to install, manage and comprehend storage solution. It is available for cloud, on-prem, and also air-gap environments. It has no single point of failure as demonstrated in the above tests. The GUI/dashboard is clean and powerful.
There are many more features available that are not even discussed in this post, check out more at
1. https://www.youtube.com/watch?v=zJY2uxLtwUk
2. https://longhorn.io/
3. https://longhorn.io/docs/1.3.0/what-is-longhorn/