This post will demonstrate creating a high-performance guest VM with cloud-init using virt-install. The Qemu/libvert/KVM stack is currently the best bet to get the near-native performance from the virtual machines. When combined with cloud-init, the stack gets more empowered and highly convenient to set up virtual machines.
This is especially helpful if you require creating a bunch of high-performance virtual machines with a predefined configuration template. The following steps are simple and easy to automate; you can find the automated procedure here.
What is cloud-init?
A quick description of Cloud-init if you are not familiar with it. Cloud-init is a fantastic technology for creating Virtual machine instances with a predefined template. In the template file, you can provide the instructions to be performed after the VM comes up for the first time. A few example instructions are User creation, setting up SSH keys, adding the user to the sudo group, setting up volumes, setting up timezone for your VM, etc. Also, you can run any command you want during the first boot. This makes the Virtual machine work-ready as soon as they are created with all the desired configurations we need.
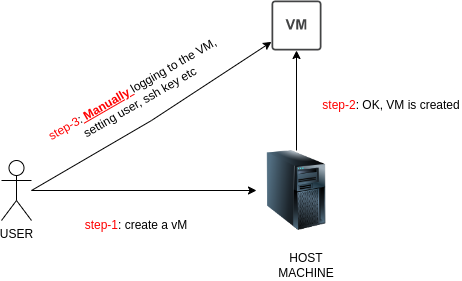
Below, two diagrams show the workflow with vs. without cloud-init.

A few notes before proceeding with this post:
1. This post is only applicable to Linux guest VMs. E.g., The steps shown here are never attempted for any windows VM.
2. This post assumes you use the default network for the guest VMs. However, you can switch to a bridged network with a minor tweak.
3. I am using Ubuntu22.04LTS as a host machine; instructions should be the same for other OS.
4. This post assumes you have sudo permissions to the host machine.
Method-1: Start of the Procedure
In this section, the use of cloud-init with virt-install is described. These commands assume you are creating a VM named “MY-DEBIAN” with the size of 80G.
step-0: Create your cloud-init configuration file; here is my sample cloud-init file.
You can find more examples about cloud-init HERE. This is my sample cloud-init file, doing nothing fancy. See the comments for the description.
#cloud-config
system_info:
  default_user:
    name: technekey
    home: /home/technekey
    sudo: ALL=(ALL) NOPASSWD:ALL
password: technekey
chpasswd: { expire: False }
hostname: MY-DEBIAN
ssh_authorized_keys:
- ssh-ed25519 AAAsfdfNzasdfsdZDIgfsdgsdTE5FAKEFAKEFAKEFAKE-FAKE-FAKEWsXhHL0ah2QUUbt1f ps@controller


# if you want to allow SSH with password, set this to true
ssh_pwauth: True


# list of packages to install after the VM comes up
package_upgrade: true
packages:
- nfs-common

#run the commands after the first install, the last command is saving VM ip into /tmp/my-ip file
runcmd:
- sudo systemctl enable iscsid
- sudo systemctl start iscsid
- sudo systemctl start apache2
- ip addr show $(ip route get 1.1.1.1  |grep -oP 'dev\s+\K[^ ]+')  |grep -oP '^\s+inet\s+\K[^/]+' |tee /tmp/my-ip
step-1: Check the virtual machines running in your host
virsh list --all
step-2: Download the cloud image of your choice
#I am using debian-10, you can google 'ubuntu cloud images'  to get download path for ubuntu.

wget https://cloud.debian.org/images/cloud/buster/latest/debian-10-generic-amd64.qcow2
step-3: Check the downloaded file format; it could be .img or .qcow2; for me its qcow2
#syntax
sudo qemu-img info <DOWNLOADED-IMAGE-FILE>

#example

sudo qemu-img info  debian-10-generic-amd64.qcow2
image: debian-10-generic-amd64.qcow2
file format: qcow2                                          #<----downloaded image is qcow2
virtual size: 2 GiB (2147483648 bytes)
disk size: 285 MiB
cluster_size: 65536
Format specific information:
    compat: 1.1
    compression type: zlib
    lazy refcounts: false
    refcount bits: 16
    corrupt: false
    extended l2: false
step-4: Create a disk for the virtual machine
#syntax


sudo qemu-img convert  -f "<IMAGE-FORMAT-FROM-ABOVE-SNIPPET>"   -O qcow2  "<DOWNLOADED-IMAGE-FILE>"   "<VM-NAME>-disk.qcow2

#example

sudo qemu-img convert  -f qcow2 -O qcow2 debian-10-generic-amd64.qcow2 "MY-DEBIAN-VM-disk.qcow2"
Step-5: Verify the disk is created
ls -lrt
total 1183984
-rw-rw-r-- 1 technekey   technekey   298785280 Mar 28 08:47 debian-10-generic-amd64.qcow2
-rw-r--r-- 1 root        root        913637376 Jun 29 13:04 MY-DEBIAN-VM-disk.qcow2  <--this
step-6: Resize the disk to the desired size
#syntax
sudo qemu-img resize  "<VM-NAME>-disk.qcow2
#example

sudo qemu-img resize  MY-DEBIAN-VM-disk.qcow2 80G
Image resized.
step-7: Create a seeding ISO to supply cloud-init data
This step would create a seeding ISO file, providing the cloud-init instructions after installation. For example, MY-DEBIAN_CLOUD_INIT.iso is created. You must have your cloud-init.yml file ready with cloud-init instructions for this step.
#syntax
sudo cloud-localds   "<VM-NAME>_CLOUD_INIT.iso"   /path/to/cloud-init/file.yml


#example:
sudo cloud-localds   "MY-DEBIAN_CLOUD_INIT.iso"   my-config.yml

#verify that the ISO file is created
ls -lrt
total 1184692
drwxrwxr-x   2 technekey   technekey        4096 Jun 29 13:11 ./
drwxr-x---+ 73 technekey   technekey        4096 Jun 29 12:54 ../
-rw-rw-r--   1 technekey   technekey         298785280 Mar 28 08:47 debian-10-generic-amd64.qcow2
-rw-r--r--   1 root        root              374784 Jun 29 13:11 MY-DEBIAN_CLOUD_INIT.iso
-rw-r--r--   1 root        root              913638656 Jun 29 13:06 MY-DEBIAN-VM-disk.qcow2
step-8: Do the installation using virt-install
The flags used in virt-install are intuitive; note that we have created a VM called MY-DEBIAN and assigned it two vCPU and 2048m memory. When you run this command, virt-install will automatically attach to the console of the VM, and you will be able to see the progress of the installation and cloud-init execution on your terminal. However, if you do not want this behavior, you can use the “–noautoconsole” flag to kick off the installation and exit.
sudo virt-install   --name "MY-DEBIAN" --disk "MY-DEBIAN-VM-disk.qcow2",device=disk,bus=virtio   --disk "MY-DEBIAN_CLOUD_INIT.iso",device=cdrom \
  --os-variant="debian10" \
  --virt-type kvm \
  --graphics none \
  --vcpus "2" \
  --memory "2048" \
  --network network=default,model=virtio \
  --console pty,target_type=serial \
  --import
You will see something like below in your virt-install output. To exit from the console, you must press Ctrl + ]. Notice that the password set via the cloud-int file is working; sudo access is provided. The point is the instructions provided in the cloud-init file are executed.
Starting install...
Creating domain...                                                                                                                                                                                            |    0 B  00:00:00
Running text console command: virsh --connect qemu:///system console MY-DEBIAN
Connected to domain 'MY-DEBIAN'
Escape character is ^] (Ctrl + ])
[    0.000000] Linux version 4.19.0-20-amd64 ([email protected]) (gcc version 8.3.0 (Debian 8.3.0-6)) #1 SMP Debian 4.19.235-1 (2022-03-17)
[    0.000000] Command line: BOOT_IMAGE=/boot/vmlinuz-4.19.0-20-amd64 root=UUID=b4e712d1-cd94-4b7c-97cd-294d3db80ec6 ro console=tty0 console=ttyS0,115200 earlyprintk=ttyS0,115200 scsi_mod.use_blk_mq=Y
[    0.000000] x86/fpu: Supporting XSAVE feature 0x001: 'x87 floating point registers'
[    0.000000] x86/fpu: Supporting XSAVE feature 0x002: 'SSE registers'
[    0.000000] x86/fpu: Supporting XSAVE feature 0x004: 'AVX registers'
[    0.000000] x86/fpu: Supporting XSAVE feature 0x008: 'MPX bounds registers'
...
.....
Starting install...
Creating domain...                                                                                                                                                                                            |    0 B  00:00:00
Running text console command: virsh --connect qemu:///system console MY-DEBIAN
Connected to domain 'MY-DEBIAN'
Escape character is ^] (Ctrl + ])
[    0.000000] Linux version 4.19.0-20-amd64 ([email protected]) (gcc version 8.3.0 (Debian 8.3.0-6)) #1 SMP Debian 4.19.235-1 (2022-03-17)
[    0.000000] Command line: BOOT_IMAGE=/boot/vmlinuz-4.19.0-20-amd64 root=UUID=b4e712d1-cd94-4b7c-97cd-294d3db80ec6 ro console=tty0 console=ttyS0,115200 earlyprintk=ttyS0,115200 scsi_mod.use_blk_mq=Y
[    0.000000] x86/fpu: Supporting XSAVE feature 0x001: 'x87 floating point registers'
[    0.000000] x86/fpu: Supporting XSAVE feature 0x002: 'SSE registers'
[    0.000000] x86/fpu: Supporting XSAVE feature 0x004: 'AVX registers'
[    0.000000] x86/fpu: Supporting XSAVE feature 0x008: 'MPX bounds registers'
....
......
......
    2.879507] cloud-init[300]: Cloud-init v. 20.2 running 'init-local' at Wed, 29 Jun 2022 18:18:37 +0000. Up 2.78 seconds.
[  OK  ] Started Initial cloud-init job (pre-networking).
[  OK  ] Reached target Network (Pre).
         Starting Raise network interfaces...
[  OK  ] Started ifup for enp1s0.
[  OK  ] Started Raise network interfaces.
         Starting Initial cloud-ini… (metadata service crawler)...
[  OK  ] Reached target Network.
....
.......
[  OK  ] Started Execute cloud user/final scripts.
[  OK  ] Reached target Cloud-init target.


# the user pass is working as per the cloud-init file.
foozzoo login: technekey
Password:
Linux foozzoo 4.19.0-20-amd64 #1 SMP Debian 4.19.235-1 (2022-03-17) x86_64

The programs included with the Debian GNU/Linux system are free software;
the exact distribution terms for each program are described in the
individual files in /usr/share/doc/*/copyright.

Debian GNU/Linux comes with ABSOLUTELY NO WARRANTY, to the extent
permitted by applicable law.
technekey@foozzoo:~$
technekey@foozzoo:~$
technekey@foozzoo:~$
technekey@foozzoo:~$
technekey@foozzoo:~$ sudo -i
root@foozzoo:~# logout
technekey@foozzoo:~$
technekey@foozzoo:~$
technekey@foozzoo:~$ cat /tmp/my-ip
192.168.122.186
technekey@foozzoo:~$
technekey@foozzoo:~$


Domain creation completed.
Step-9: Check VM status
#check the running VM list, use --all to see the VM is shutdown state as well
virsh list
 Id   Name        State
---------------------------
 1    MY-DEBIAN   running

# detailed VM info

virsh dominfo MY-DEBIAN
Id:             1
Name:           MY-DEBIAN
UUID:           e9e3b3b4-a8c8-4202-a7fc-3de47b7e9f79
OS Type:        hvm
State:          running
CPU(s):         2
CPU time:       38.2s
Max memory:     2097152 KiB
Used memory:    2097152 KiB
Persistent:     yes
Autostart:      disable
Managed save:   no
Security model: apparmor
Security DOI:   0
Security label: libvirt-e9e3b3b4-a8c8-4202-a7fc-3de47b7e9f79 (enforcing)


# IP Address of the VM

virsh domifaddr MY-DEBIAN
 Name       MAC address          Protocol     Address
-------------------------------------------------------------------------------
 vnet0      52:54:00:bd:30:d7    ipv4         192.168.122.186/24


# To attach to the VM console

virsh domifaddr MY-DEBIAN
 Name       MAC address          Protocol     Address
-------------------------------------------------------------------------------
 vnet0      52:54:00:bd:30:d7    ipv4         192.168.122.186/24
Cleanup:
You will see the following three files present in the working directory of your host machine. Here “MY-DEBIAN-VM-disk.qcow2” is the attached disk to the volume; the user can delete the other two files without impacting the VM functions.
ls -lrt
total 2778868
-rw-rw-r-- 1 technekey    technekey   298785280 Mar 28 08:47 debian-10-generic-amd64.qcow2
-rw-r--r-- 1 libvirt-qemu kvm     374784 Jun 29 13:11 MY-DEBIAN_CLOUD_INIT.iso
-rw-r--r-- 1 libvirt-qemu kvm 2546073600 Jun 29 15:29 MY-DEBIAN-VM-disk.qcow2
However, if you want to do the complete cleanup, you can run the following command to delete the VM and its disk:
 virsh destroy MY-DEBIAN
 virsh undefine MY-DEBIAN --remove-all-storage  # <--This will completly wipe out the VM forever
Summary:
libvert/qemu/KVM stack is currently the best way to achieve near-native performance. When combined with cloud-init, things could not be better when creating a VM.
I have tested Ubuntu bionic and Arch Linux with the same steps, and they work just fine. Let me know if your cloud image is not working with these commands. Thanks!