Kubernetes has multiple types of services type to offer to the user. A user can choose the right fit based on the requirement. This post will demonstrate leveraging the externlName service type for traffic redirection.
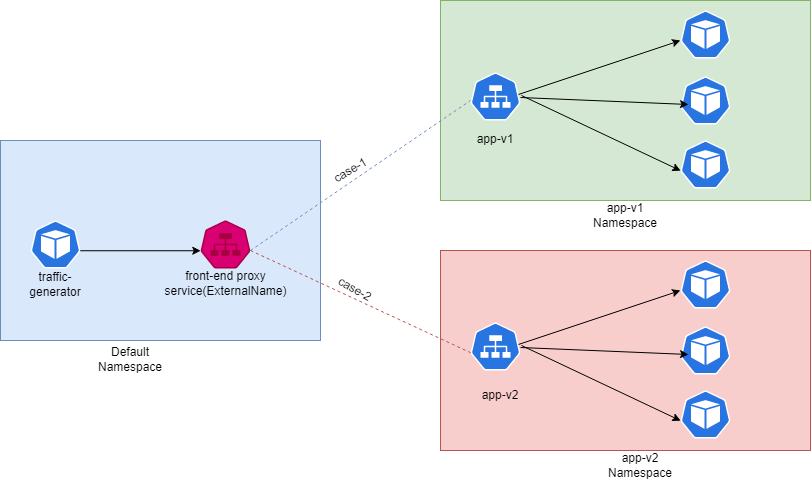
Let’s assume a scenario where I have two versions of the same application running, and I want to move traffic(generated from a pod called traffic-generator) from V1 to V2 and vice versa frequently. There are multiple ways of doing it, but we will do the traffic movement in this post using ExternalName service. My traffic flow would look like the below diagram.
Creating the above setup
#create the namespaces app-v1 and app-v2
kubectl create namespace app-v1
kubectl create namespace app-v2

#Create the two deployments in both namespace, I am creating 3 replicas
# for app-v1 I am using nginx image, whereas for app-v2 I am using httpd, for ease of diff
kubectl create deployment -n app-v1 app-v1 --image nginx --replica 3
kubectl create deployment -n app-v2 app-v2 --image httpd --replica 3

#exposing both applications using cluster IP
kubectl expose deployment app-v1 --port 80 -n app-v1
kubectl expose deployment app-v2 --port 80 -n app-v2
Now we have applications and services created for the two namespaces; note that I have used httpd and nginx images to differentiate between the curl output(later). Also, using three replicas is optional; you can just use one replica.
Now, we will create the externalName service type in the default namespace; that service will point to the DNS name of app-v1 or app-v2 based on what we will be setting.
apiVersion: v1
kind: Service
metadata:
  name: front-end
  namespace: default
spec:
  externalName: app-v2.app-v2.svc.test.local
  ports:
  - name: http
    port: 80
    protocol: TCP
    targetPort: tcp
  sessionAffinity: None
  type: ExternalName
status:
  loadBalancer: {}
Now, we will create a traffic source in the default namespace(could be any). Below command would create a pod in the default namespace with a curl image.
kubectl run curl-pod --image curlimages/curl --command sleep infinityNow let’s send some traffic to the front-end service earlier created.
kubectl exec -it curl-pod -- curl front-end.default.svc
<html><body><h1>It works!</h1></body></html>
Let’s flip the externalName in the front-end service to point to app-v1. Note that currently, it is pointing to app-v2.
kubectl patch service front-end -p '{"spec":{"externalName":"app-v1.app-v1.svc"}}'Sending traffic again to the front-end service.
kubectl exec -it curl-pod -- curl front-end.default.svc
<!DOCTYPE html>
<html>
<head>
<title>Welcome to nginx!</title>
<style>
html { color-scheme: light dark; }
body { width: 35em; margin: 0 auto;
font-family: Tahoma, Verdana, Arial, sans-serif; }
</style>
</head>
<body>
<h1>Welcome to nginx!</h1>
<p>If you see this page, the nginx web server is successfully installed and
working. Further configuration is required.</p>

<p>For online documentation and support please refer to
<a href="http://nginx.org/">nginx.org</a>.<br/>
Commercial support is available at
<a href="http://nginx.com/">nginx.com</a>.</p>

<p><em>Thank you for using nginx.</em></p>
</body>
</html>
Summary:
- You can use any CNAME of an external service or FQDN of any Kubernetes service. E.g.,
<servicename>.<namespace>.svc.cluster.local - You can notice that using just one command
kubectl patch(example above) traffic can be switched between services. - This is not the only way of switching traffic between applications but just one way.