In this post, we will see how Kubespray could be used to create a cluster on an On-Prem environment(or on your laptop with a bunch of virtual machines). Kubespray is a “Certified Kubernetes Distributions, Hosted Platforms, and Installers.”
You can create a Kubernetes cluster using kubespray with minimal configuration in the inventory file. However, It is highly configurable, and the correct configuration is needed to get the production-like configuration. We will see what and where to configure these values.
The two most vital parts of any Kubernetes cluster are API-Server(brain) and etcd(the database). They typically run in the control plain nodes with three or five replicas., sometimes more. The reason for running multiple instances of API Server and ETCD is apparent; we do not want a single point of failure in production. Generally, the control-plain nodes are geo-located in different zones/regions to achieve higher availability. However, everything will run on my local machine for this post.
The Kubernetes documentation provides the specification for the nodes as below, also hyperlinked here:
- 2 GB or more of RAM per machine (any less will leave little room for your apps).
- 2 CPUs or more.
- Full network connectivity between all machines in the cluster (public or private network is fine).
- Unique hostname, MAC address, and product_uuid for every node. See here for more details.
- Certain ports are open on your machines. See here for more details.
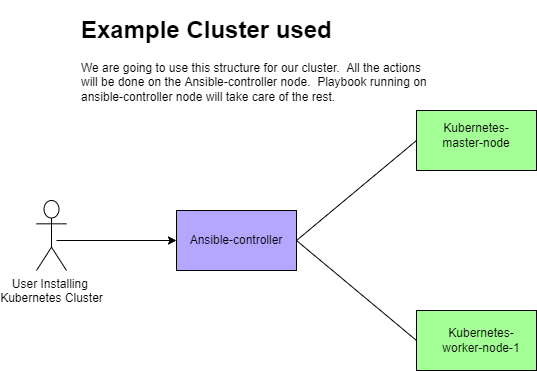
Here is the structure we will be creating, ansible controller can be deleted after creation
The entire concept discussed on this page is also automated end-to-end for faster cluster creation; if interested, check this page.
- Three controller nodes (you can use one if you do not have enough resources)
- Three worker node
- One ansible-controller(Kubespray playbook will be triggered here)
In this post, we have created a very basic Kubernetes cluster. This is fine for development and learning. However, you will not find such a cluster in the production. Consider reading this if you are looking for a production-grade cluster resilient to failure.
 Name   MAC address      Protocol Address           Id  Name              State
----------------------------------------------------------------------------------
vnet23 52:54:00:fe:d4:97 ipv4     192.168.122.51/24  24 kube-controller-1 running
vnet24 52:54:00:62:2f:42 ipv4     192.168.122.100/24 25 kube-controller-2 running
vnet25 52:54:00:da:90:d8 ipv4     192.168.122.250/24 26 kube-controller-3 running
vnet26 52:54:00:98:10:1a ipv4     192.168.122.150/24 27 kube-worker-1     running
vnet27 52:54:00:53:0f:12 ipv4     192.168.122.139/24 28 kube-worker-2     running
vnet28 52:54:00:38:57:02 ipv4     192.168.122.98/24  29 kube-worker-3     running
Steps to use Kubespray to create a cluster
Step-1: Create the nodes (skip if you already have a bunch of VMs ready)
Create the controller and worker nodes using vagrant, virtual box, or any other tool. I have created one controller node and one worker node in this example. I am not covering how to create a virtual machine here.
Step-2: Create an ansible controller node(could be a virtual machine or any existing node with ansible)
Create an additional virtual machine that we will use to communicate to the controller and worker nodes.
Step-3: Install git and pip3
sudo apt update && sudo apt-get -y install python3-pip git -yStep-4: Clone the git repo
techie@ansible-controller:~$ git clone https://github.com/kubernetes-sigs/kubespray.git
Cloning into 'kubespray'...
remote: Enumerating objects: 59019, done.
remote: Counting objects: 100% (770/770), done.
remote: Compressing objects: 100% (444/444), done.
remote: Total 59019 (delta 282), reused 656 (delta 237), pack-reused 58249
Receiving objects: 100% (59019/59019), 17.39 MiB | 16.49 MiB/s, done.
Resolving deltas: 100% (33160/33160), done.
techie@ansible-controller:~$
Step-5: Install the requirements for kubespray
techie@ansible-controller:~$ cd kubespray/
techie@ansible-controller:~/kubespray$ sudo pip3 install -r requirements.txt
Step-6: Make a list of the IP address of the nodes
Here store all the note IPs in the bash array called IPS. Here, 1st IP is the master IP and 2nd IP is the worker IP. Here , We also copy sample inventory data to a new directory called mycluster.
techie@ansible-controller:~/kubespray$ declare -a IPS=(192.168.122.51 192.168.122.100 192.168.122.250 192.168.122.150 192.168.122.139 192.168.122.98)
techie@ansible-controller:~/kubespray$ cp -rfp inventory/sample inventory/mycluster
techie@ansible-controller:~/kubespray$ echo ${IPS[@]}
192.168.122.51 192.168.122.100 192.168.122.250 192.168.122.150 192.168.122.139 192.168.122.98
techie@ansible-controller:~/kubespray$
Step-7: Built the inventory file using the list IP address
Here Kubespray would build an inventory file for us based on the number of nodes we provided. In the following steps, we supplied the list of nodes via ${IPS[@]}. However, this does not mean that we cannot design our cluster. We can and should design the cluster by modifying the inventory file in the next step.
techie@ansible-controller:~/kubespray$ CONFIG_FILE=inventory/mycluster/hosts.yaml python3 contrib/inventory_builder/inventory.py ${IPS[@]}
DEBUG: Adding group all
DEBUG: Adding group kube_control_plane
DEBUG: Adding group kube_node
DEBUG: Adding group etcd
DEBUG: Adding group k8s_cluster
DEBUG: Adding group calico_rr
DEBUG: adding host node1 to group all
DEBUG: adding host node2 to group all
DEBUG: adding host node3 to group all
DEBUG: adding host node4 to group all
DEBUG: adding host node5 to group all
DEBUG: adding host node6 to group all
DEBUG: adding host node1 to group etcd
DEBUG: adding host node2 to group etcd
DEBUG: adding host node3 to group etcd
DEBUG: adding host node1 to group kube_control_plane
DEBUG: adding host node2 to group kube_control_plane
DEBUG: adding host node1 to group kube_node
DEBUG: adding host node2 to group kube_node
DEBUG: adding host node3 to group kube_node
DEBUG: adding host node4 to group kube_node
DEBUG: adding host node5 to group kube_node
DEBUG: adding host node6 to group kube_node
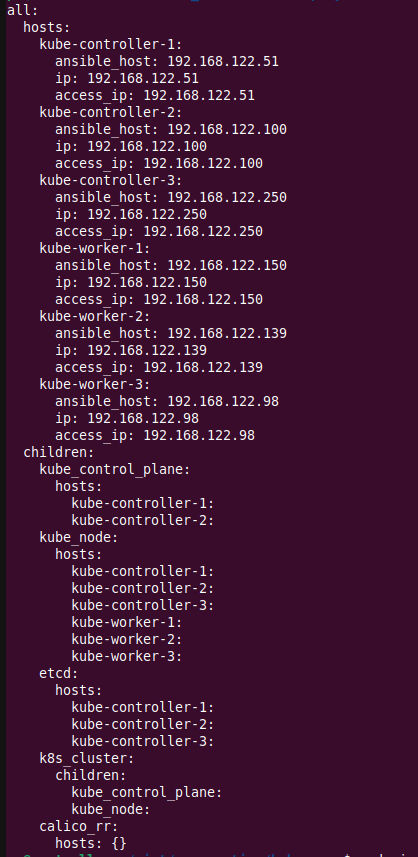
Step-8: Vizualize the automatically created inventory file
Check the inventory file and note that all the nodes are added to the inventory file. A few are assigned to the “kube_control_plane” host group, and others are assigned to the “kube_node” group. This essentially means that The nodes belonging to “kube_control_plane” would be controller nodes, while the nodes assigned to “kube_node” would be worker nodes.
cat  inventory/mycluster/hosts.yaml
all:
  hosts:
    node1:
      ansible_host: 192.168.122.51
      ip: 192.168.122.51
      access_ip: 192.168.122.51
    node2:
      ansible_host: 192.168.122.100
      ip: 192.168.122.100
      access_ip: 192.168.122.100
    node3:
      ansible_host: 192.168.122.250
      ip: 192.168.122.250
      access_ip: 192.168.122.250
    node4:
      ansible_host: 192.168.122.150
      ip: 192.168.122.150
      access_ip: 192.168.122.150
    node5:
      ansible_host: 192.168.122.139
      ip: 192.168.122.139
      access_ip: 192.168.122.139
    node6:
      ansible_host: 192.168.122.98
      ip: 192.168.122.98
      access_ip: 192.168.122.98
  children:
    kube_control_plane:
      hosts:
        node1:
        node2:
    kube_node:
      hosts:
        node1:
        node2:
        node3:
        node4:
        node5:
        node6:
    etcd:
      hosts:
        node1:
        node2:
        node3:
    k8s_cluster:
      children:
        kube_control_plane:
        kube_node:
    calico_rr:
      hosts: {}
Step-9: Modify the inventory to rename the hostname and host groups
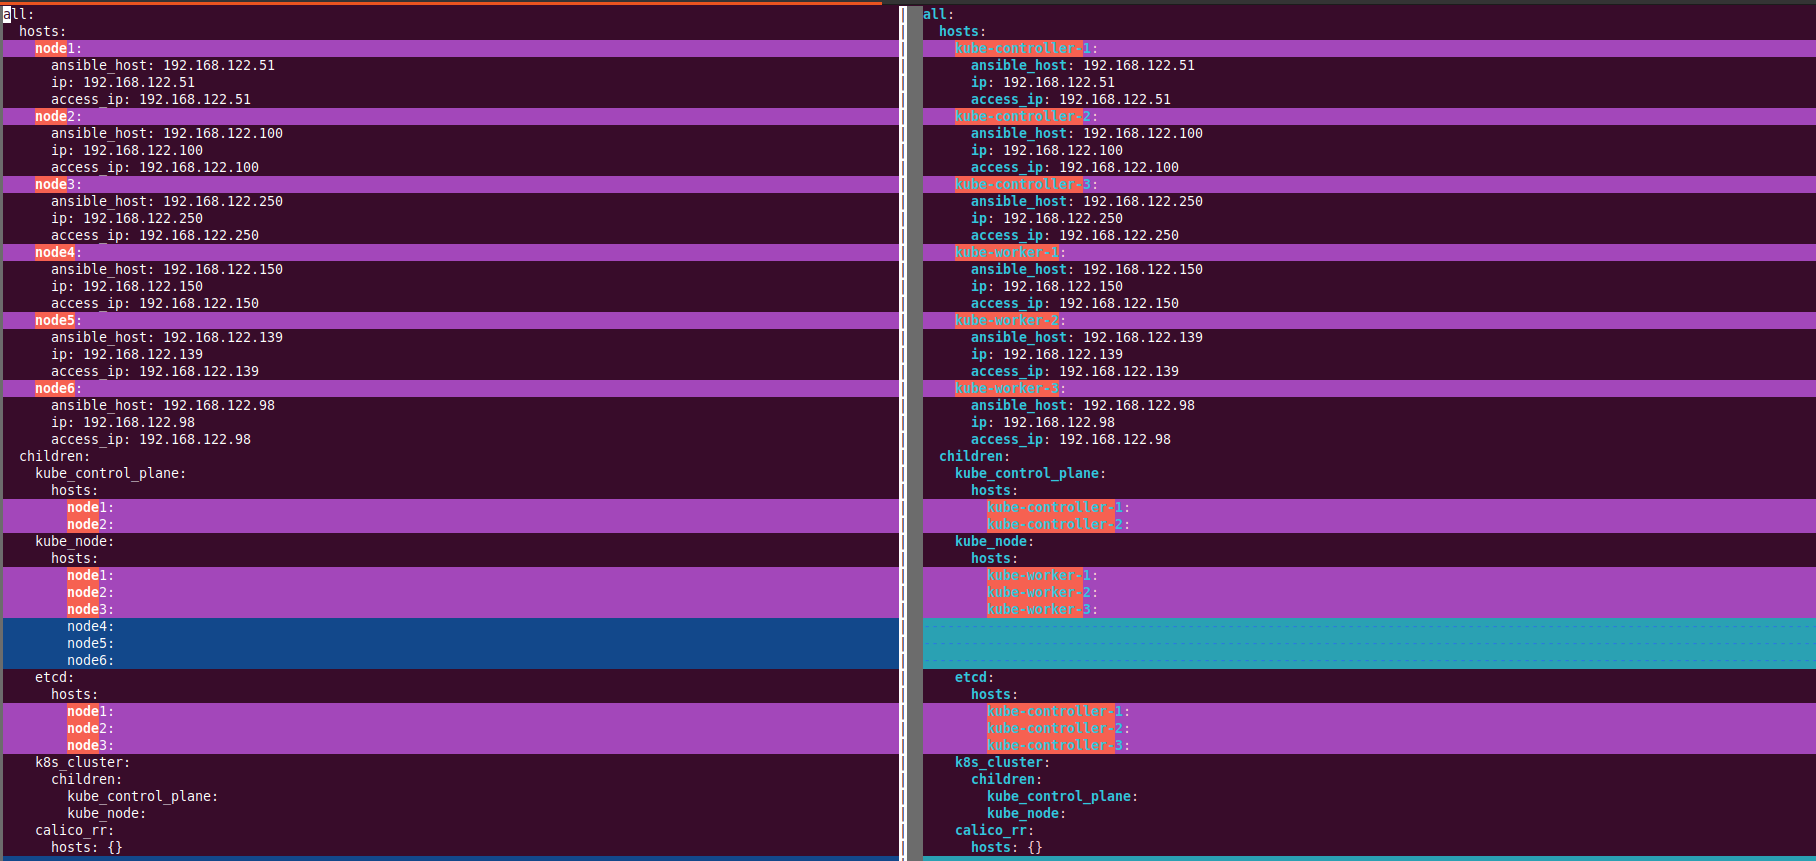
I have used the “sed” command to rename the hostnames to my choice. Feel free to use any text editor to modify the changes. If you are not familiar with the sed command, it’s highly recommended not to use sed and use VIM to modify the inventory file. This caution is recommended because users should always make educated changes in the inventory file that reflects in the cluster design.
sed -i 's/node1/kube-controller-1/g' inventory/mycluster/hosts.yaml
sed -i 's/node2/kube-controller-2/g' inventory/mycluster/hosts.yaml
sed -i 's/node3/kube-controller-3/g' inventory/mycluster/hosts.yaml
sed -i 's/node4/kube-worker-1/g'     inventory/mycluster/hosts.yaml
sed -i 's/node5/kube-worker-2/g'     inventory/mycluster/hosts.yaml
sed -i 's/node6/kube-worker-3/g'     inventory/mycluster/hosts.yaml
Now my inventory file looks like the below; the hostname of the nodes are good now. (Eg: changed from nodeX to Kube-controller-X). However, if carefully noted, my “kube_node” host group is still having Kube-controller-X nodes. I do not want my controller nodes to run the payload pods. I want my controller nodes to only manage control plane activities. So, I will remove all the control plan nodes from the “kube_node” group.
I will use the “sed” command, but you can use vim instead. The following command is deleting all the lines that contain “Kube-controller-” between “kube_node:” and “etcd”
sed -r -i '/^\s+kube_node:/,/etcd:/ {/.*kube-controller-.*/d}' inventory/mycluster/hosts.yamlThe following is my final inventory file: This file means,
- Kube-api server would be running on kube-controller-1 and kube-controller-2 nodes.
- ETCD will be running on kube-controller-1, kube-controller-2 and kube-controlle-3 nodes.
- Workload will be running on kube-worker-1, kube-worker-2 and kube-worker-3 nodes.

Here is the difference between the ORIGNAL inventory and the inventory I have designed for my cluster.
Step-10: Do customization over the out-of-the-box configuration
It is a good idea to do at least some really important configuration to the provided kubespray settings. Note, that this step is optional and does not cover all the customization. Only a few really critical customizations are shown here. These changes are done in the inventory/mycluster/group_vars/k8s_cluster/k8s-cluster.yml file. I hope with the following examples; you will get the idea that where the configuration of the cluster is done, feel free to modify the parameters not described here. See official documentation for more help.
I would strongly suggest enabling the parameter described in STEP-10E for ease of use.
Step-10A: Enable audit logs
# audit log for kubernetes
- kubernetes_audit: false
+ kubernetes_audit: true
Step-10B: Review or change the container runtime; by default, its set to containerd
## Container runtime
## docker for docker, crio for cri-o and containerd for containerd.
## Default: containerd
container_manager: containerd
Step-10C: Review of change the networking plugin; by default, its set to calico
# Choose network plugin (cilium, calico, kube-ovn, weave or flannel. Use cni for generic cni plugin)
# Can also be set to 'cloud', which lets the cloud provider setup appropriate routing
kube_network_plugin: calico
Step-10D: Review or change the desired Kubernetes version; at the time of writing this post the default version is 1.24.2
## Change this to use another Kubernetes version, e.g. a current beta release
kube_version: v1.24.2
Step-10E: Configure to copy the kubeconfig file to the ansible controller after the cluster setup is done
# Make a copy of kubeconfig on the host that runs Ansible in {{ inventory_dir }}/artifacts
- kubeconfig_localhost: false
+ kubeconfig_localhost: true
Step-11: Add the addons
Again, this is an optional step but good to know. Kubespray makes things easier for us, by providing options to install several addons during the cluster bootstrapping. This brings the cluster to ready to use after creation and saves time. All the addons configuration is located at the inventory/mycluster/group_vars/k8s_cluster/addons.yml file. At least, the following are a few changes I would do. RED is the old value, green is the value I am setting now. The following are only examples, there are several more addons that are present and could be enabled. Feel free to adjust as per your requirement.
# Helm deployment
- helm_enabled: false
+ helm_enabled: true
Enable the matrics server; note the comments are also removed
# Metrics Server deployment
metrics_server_enabled: true
metrics_server_container_port: 4443
metrics_server_kubelet_insecure_tls: true
metrics_server_metric_resolution: 15s
metrics_server_kubelet_preferred_address_types: "InternalIP,ExternalIP,Hostname"
Enable dashboard
# Kubernetes dashboard
# RBAC required. see docs/getting-started.md for access details.
- # dashboard_enabled: false
+ dashboard_enabled: true
Step-12: Create SSH Key-based authentication
Ansible controller must have SSH access to controller and worker node without password. If the VM prompts for a password then you must run this step. Repeat this step for all the master and worker nodes. This would prompt for a password, enter the password when prompted.
ssh-copy-id 192.168.122.51
/usr/bin/ssh-copy-id: INFO: Source of key(s) to be installed: "/home/techie/.ssh/id_ed25519.pub"
The authenticity of host '192.168.122.51 (192.168.122.51)' can't be established.
ECDSA key fingerprint is SHA256:kScNEUWPEJc2H2FMClzRU7TDB/iR1BxwZYKUxlWNRZ8.
Are you sure you want to continue connecting (yes/no/[fingerprint])? yes
/usr/bin/ssh-copy-id: INFO: attempting to log in with the new key(s), to filter out any that are already installed
/usr/bin/ssh-copy-id: INFO: 1 key(s) remain to be installed -- if you are prompted now it is to install the new keys
[email protected]'s password:
Number of key(s) added: 1
Now try logging into the machine, with: "ssh '192.168.122.51'" and check to make sure that only the key(s) you wanted were added.
Step-13: Trigger the playbook for cluster orchestration
The final step is to trigger the playbook execution; this command would take ~15 minutes for (1 master + 1 worker configuration). Once the playbook is completed, the cluster is ready to roll out. (see Notes at the bottom for issues)
export ANSIBLE_TIMEOUT=120;
ansible-playbook -i inventory/mycluster/hosts.yaml --become --become-user=root cluster.yml -K -u <node-ssh-user-name>
BECOME password:
Step-14: Copy the kubeconfig file from the master node
If you have done the step described in STEP10-E, then your kubeconfig file should be already copied to your ansible controller node.
ls inventory/mycluster/artifacts/admin.conf
inventory/mycluster/artifacts/admin.conf
# However, if you have node done the step10E, then you must do the following on your master nodemkdir -p $HOME/.kube
sudo cp -i /etc/kubernetes/admin.conf $HOME/.kube/config
sudo chown $(id -u):$(id -g) $HOME/.kube/config
Copy the kubeconfig to your local ansible controller.
scp technekey@<MASTER_NODE_IP>:~/.kube/config .Step-15: Validate the node configuration; it should be as per the inventory designed in the earlier steps
kubectl get node -owide --kubeconfig inventory/mycluster/artifacts/admin.conf
NAME                 STATUS ROLES         AGE     VERSION INTERNAL-IP     EXTERNAL-IP OS-IMAGE    KERNEL-VERSION         CONTAINER-RUNTIME
kube-controller-1    Ready  control-plane 9m34s   v1.24.2 192.168.122.51  <none>      Ubuntu 22.04 LTS 5.15.0-39-generic containerd://1.6.6
kube-controller-2    Ready  control-plane 9m      v1.24.2 192.168.122.100 <none>      Ubuntu 22.04 LTS 5.15.0-39-generic containerd://1.6.6
kube-worker-1        Ready  <none>        8m2s    v1.24.2 192.168.122.150 <none>      Ubuntu 22.04 LTS 5.15.0-39-generic containerd://1.6.6
kube-worker-2        Ready  <none>        8m3s    v1.24.2 192.168.122.139 <none>      Ubuntu 22.04 LTS 5.15.0-39-generic containerd://1.6.6
kube-worker-3        Ready  <none>        8m2s    v1.24.2 192.168.122.98  <none>      Ubuntu 22.04 LTS 5.15.0-39-generic containerd://1.6.6
Step-16: Validate that the addons we setup in step-11 are also configured
For example, the matrics server is correctly configured and working just after bootstrapping without manually installing.
kubectl top node
NAME              CPU(cores) CPU% MEMORY(bytes) MEMORY%
kube-controller-1 228m       12%  1393Mi        102%
kube-controller-2 204m       11%  1299Mi        95%
kube-worker-1 73m            3%   1041Mi        64%
kube-worker-2 68m            3%   1030Mi        63%
kube-worker-3 79m            4%   1060Mi        65%
Cleanup:
If you think something is wrong is done, or you want to reverse the Kubespray actions. You can trigger reset.yaml playbook. Where <remote-ssh-user> is the username of the users configured on the various nodes.
export ANSIBLE_TIMEOUT=120;
ansible-playbook -i inventory/mycluster/hosts.yaml --become --become-user=root reset.yml -K -u <remote-ssh-user>
BECOME password: