What is a validation webhook in Kubernetes?
If you are a Kubernetes administrator or learning the security and administration in the Kubernetes environment, this post is for you. Here, I have described the importance of the webhooks, and their uses, and explained how these webhooks may benefit you in administrating your cluster.
The out-of-the-box Kubernetes installation is suitable for most folks. Still, every organization/project wants to enforce some good practices they find necessary for their clusters for the production environment. Sometimes, these checks are not possible with the plain Kubernetes. Still, thanks to the pluggable architecture of the Kubernetes it offers us to write our custom code to validate or modify the activities done in the cluster.
NOTE: This post does not cover the steps to set up the validation webhooks, the steps to set up webhooks are discussed here.

Prerequisite:
- You will need a Kubernetes cluster if you want to repeat the steps.
- A basic Kubernetes administration knowledge.
- A basic understanding of JSON.
- Basic knowledge of python or Golang. (depending on your choice). I am using Python in this post for simplicity.
What are admission webhooks?
In simple terms, I would imagine the webhooks as cluster police that the cluster administrator deploys to enforce the organizational policies in the cluster. Sometimes, this cluster police would deny the requests by marking them as illegal or modifying the request before execution.
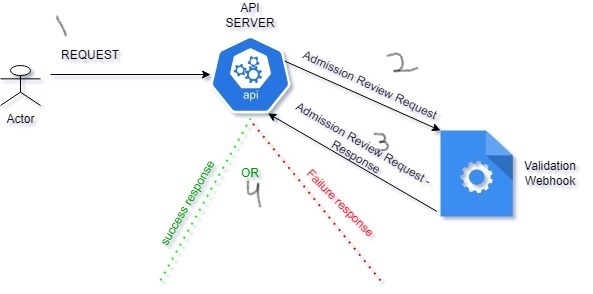
In reality, when a client(Eg: kubectl) makes any request in the cluster, the API Server sends a review request to the webhook(a webserver). This review request is a JSON object containing all the important contents of the original request meant for the API Server.
The duty of the webhook is to analyze the JSON(review request) and respond back to the API Server with its response. The webhook may respond, with a go-ahead, a denial, or some modification to the original request. Based on the response the API Server would proceed with the request.
There are two types of admission webhooks:
- Validating admission webhook: These webhooks read the request and validate the content of the request and take a decision to let it pass or deny it. A simple example is if the deployment is not having a label foo=bar, prohibit the creation of the deployment.
- Mutating admission webhook: These webhooks can modify the original request and return it to the Kube-API server. Example: If the deployment is not having a label foo=bar during the deployment creation request, mutate the request and add the label.
The Sequence of the webhook getting called during the request:
There could be zero or more validation or mutation webhooks running in the cluster. At first, when a request is made to API Server, the Mutation webhooks would be called to mutate the request if needed. Once the mutation of the request is completed, the validation webhooks will be called.
The sequence is mutated first and validated later. this is to ensure that, the mutation would not introduce any unwanted content in the request, which would have caused validation to fail.
Why do we need a Validation webhook?
- Security: Not all the users in the cluster are well versed with the best practices of the organization and Kubernetes. We need guardrails for everyone. These webhooks can act as the second line of defense by preventing a novice user from doing a blunder. RBAC is the first one.
- RBAC is not enough(again security!): Imagine, a junior developer got RBAC permissions to create the deployments in the cluster. They may pull a vulnerable image from the internet to create the pod in the cluster. Note that RBCA will gladly let it go through as the “junior developer” has the permissions to create the pod. Since a variable pod is now running in the cluster, it has exposed the entire cluster to risk if the container breaks out. This example is an administrator’s nightmare, they want to prevent this from happening by not letting anyone pull images from the internet, but rather letting them use the organization’s internal repository.
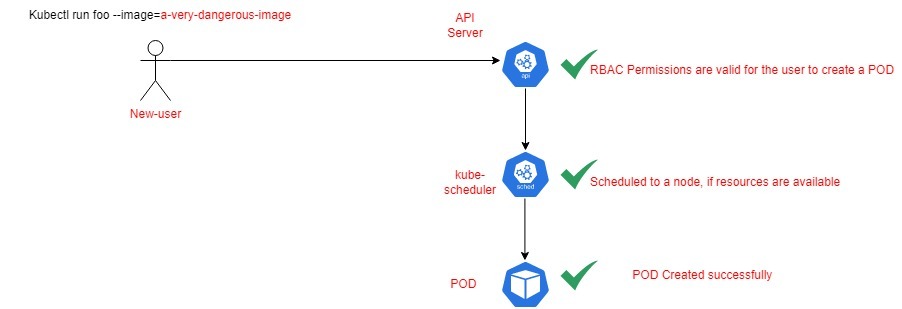
The above diagram shows that anyone with enough RBAC permissions may accidentally introduce any unsafe container to the cluster, causing a larger or unknown effect in case of container breakout.
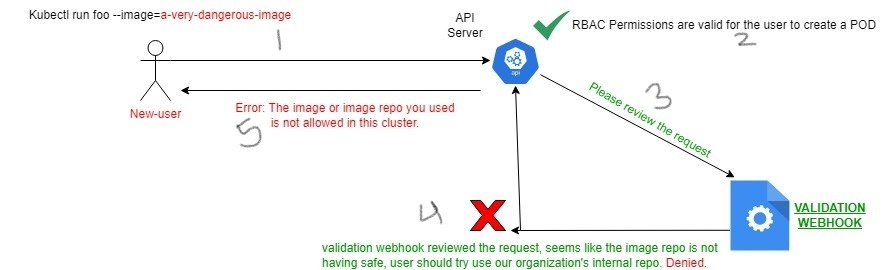
However, in the below example, the API Server is sending a review request to the validation webhook hook to perform custom validations based on our requirements. Based on the response, either allow or fail the request.
Where does the webhook code run?
The webhook is typically a webserver running external to the cluster OR inside the same cluster in a (separate namespace). In this post, we will deploy the webhook as deployment and expose it as a service in the same cluster.
programming language for webhook?
You can use any programming language that supports, REST and JSON. Examples, are Python and Golang. In production, you will find most of the webhooks in Golang, however, in this post for simplicity, we will use Python
Example: Beauty of the webhooks
we will see an example of a validation webhook, where the duty of the webhook is to:
Ensure that only deployments with “allow=ok” label present are allowed to be created in the “technekey” namespace. If the label is not present, fail the deployment creation.
example of an Admission Review Request:
When I am executing “kubectl create deployment -n technekey foobar–image=nginx“, the following admission review request is generated by the API Server and sent to the webhook. This admission review request consists of a bunch of important parameters, which the webhook can use to validate the request as per business logic.
{
   "kind":"AdmissionReview",
   "apiVersion":"admission.k8s.io/v1",
   "request":{
      "uid":"0943ee9e-f36e-4f20-b641-a4f2682abb6b",
      "kind":{
         "group":"apps",
         "version":"v1",
         "kind":"Deployment"
      },
      "resource":{
         "group":"apps",
         "version":"v1",
         "resource":"deployments"
      },
      "requestKind":{
         "group":"apps",
         "version":"v1",
         "kind":"Deployment"
      },
      "requestResource":{
         "group":"apps",
         "version":"v1",
         "resource":"deployments"
      },
      "name":"foobar",
      "namespace":"technekey",
      "operation":"CREATE",
      "userInfo":{
         "username":"kubernetes-admin",
         "groups":[
            "system:masters",
            "system:authenticated"
         ]
      },
      "object":{
         "kind":"Deployment",
         "apiVersion":"apps/v1",
         "metadata":{
            "name":"foobar",
            "namespace":"technekey",
            "uid":"7a4b91e2-8a67-4368-b8c3-6469ee7a3194",
            "generation":1,
            "creationTimestamp":"2022-05-26T18:05:19Z",
            "labels":{
               "app":"foobar"
            },
         "spec":{
            "replicas":1,
            "selector":{
               "matchLabels":{
                  "app":"foobar"
               }
            },
            "template":{
               "metadata":{
                  "creationTimestamp":"None",
                  "labels":{
                     "app":"foobar"
                  }
               },
               "spec":{
                  "containers":[
                     {
                        "name":"nginx",
                        "image":"nginx",
                        "resources":{

                        },
                        "terminationMessagePath":"/dev/termination-log",
                        "terminationMessagePolicy":"File",
                        "imagePullPolicy":"Always"
                     }
                  ],
                  "restartPolicy":"Always",
                  "terminationGracePeriodSeconds":30,
                  "dnsPolicy":"ClusterFirst",
                  "securityContext":{

                  },
                  "schedulerName":"default-scheduler"
               }
            },
            "strategy":{
               "type":"RollingUpdate",
               "rollingUpdate":{
                  "maxUnavailable":"25%",
                  "maxSurge":"25%"
               }
            },
            "revisionHistoryLimit":10,
            "progressDeadlineSeconds":600
         },
         "status":{

         }
      },
      "oldObject":"None",
      "dryRun":false,
      "options":{
         "kind":"CreateOptions",
         "apiVersion":"meta.k8s.io/v1",
         "fieldManager":"kubectl-create"
      }
   }
}
Example of the review request’s response
When the Review request is sent to the webhook from API Server, the validation webhook will either allow or fail the request. Below there are two responses(cases) in JSON format. The first one is when the webhook denied the request, and the second one is for a successful case.
Case-i: When the allow:ok label is not present
{
   "apiVersion":"admission.k8s.io/v1",
   "kind":"AdmissionReview",
   "response":{
      "allowed":false,
      "status":{
         "message":"Deployment must have 'allow' label to be admitted."
      },
      "uid":"072373f1-3943-4532-8ff0-cca205027358"
   }
}
Notice the response, The webhook denied the request when the “allow=ok” label is not present.
kubectl create  -f - << EOF
> apiVersion: apps/v1
kind: Deployment
metadata:
  labels:
    app: foobar
  name: foobar
  namespace: technekey
spec:
  replicas: 1
  selector:
    matchLabels:
      app: foobar
  template:
    metadata:
      labels:
        app: foobar
    spec:
      containers:
      - image: nginx
        name: nginx
> EOF
Error from server: error when creating "STDIN": admission webhook "validation-webhook.custom-webhooks.svc" denied the request: Deployment must have 'allow' label to be admitted.
Case-II: When allow:ok label is present
{
   "apiVersion":"admission.k8s.io/v1",
   "kind":"AdmissionReview",
   "response":{
      "allowed":true,
      "uid":"991811dc-aa97-4074-af73-9f98b38ad44f"
   }
}
Notice the response, The webhook approves the request when the “allow=ok” label is present.
kubectl create  -f  - << EOF
apiVersion: apps/v1
kind: Deployment
metadata:
  labels:
    app: foobar
    allow: ok
  name: foobar
  namespace: technekey
spec:
  replicas: 1
  selector:
    matchLabels:
      app: foobar
  template:
    metadata:
      labels:
        app: foobar
    spec:
      containers:
      - image: nginx
        name: nginx
EOF
deployment.apps/foobar created
Summary:
To keep this post size in control. I will write about the steps to create and set up a webhook in the next post and I will link the subsequent post here.