There are Multiple choices are available to run ansible playbooks via GUI, like AWX, Ansible tower, ansible semaphore, etc. However, this post will demo how to set up an ansible semaphore pod in the Kubernetes cluster.
At the time of writing this post, the official document of ansible semaphore provides the following installation methods:
snap packagebinarydocker-composebinary run as a systemctl service
Installing ansible semaphore on Kubernetes cluster
A few points to note:
1. For the semaphore pod to work, it requires a database. So we will be setting MySQL container for semaphore’s backend storage.
2. Semaphore and MySQL containers require access to sensitive information like admin passwords, Database passwords, etc. So, we will be storing the sensitive information in a Kubernetes secret.
Step 1: Create a secret to store sensitive information
I have put the sensitive data into a secret called “semaphore-secret.” for simplicity, I have set all the users/passwords to “semaphore.”
apiVersion: v1
kind: Secret
metadata:
  name: semaphore-secret
type: Opaque
data:
  #use echo -n <base64-encoded-string> |base64 -d to decode
  #needed by semaphore container
  SEMAPHORE_ADMIN: c2VtYXBob3Jl
  SEMAPHORE_ADMIN_NAME: c2VtYXBob3Jl
  SEMAPHORE_ADMIN_PASSWORD: c2VtYXBob3Jl
  SEMAPHORE_DB_USER: c2VtYXBob3Jl
  SEMAPHORE_DB_PASS: c2VtYXBob3Jl
  #needed by mysql container
  MYSQL_USER: c2VtYXBob3Jl
  MYSQL_PASSWORD: c2VtYXBob3Jl
  MYSQL_ROOT_PASSWORD: c2VtYXBob3Jl
step 2: Create semaphore and MySQL deployment
The below manifest is inspired by the docker-compose.yml file provided in the official documentation. This manifest would create a deployment, and each pod in this deployment would have two containers, 1st for semaphore and 2nd for the database.
For a demo using this simple configuration for production note the following points:
1. You might want to use a separate deployment or statefulset for the database in a production environment.
2. If you choose to decouple the two containers, you must change all the references of 127.0.0.1 to a proper service name(FQDN).
3. Here, I have to use hostPath volume, but you should use volume claim
Many of the environment variables set here use the secret created in the previous step.
apiVersion: apps/v1
kind: Deployment
metadata:
  labels:
    app: semaphore
  name: semaphore
spec:
  replicas: 1
  selector:
    matchLabels:
      app: semaphore
  template:
    metadata:
      labels:
        app: semaphore
    spec:
      volumes:
      # do not use hostPath, use volumeClaim in real world usecase
      - name: semaphore-db-vol
        hostPath:
          path: /tmp/semaphore
      containers:
        - env:
            - name: MYSQL_DATABASE
              value: semaphore

            - name: MYSQL_USER
              valueFrom:
                secretKeyRef:
                  name: semaphore-secret
                  key: MYSQL_USER
                  optional: false

            - name: MYSQL_PASSWORD
              valueFrom:
                secretKeyRef:
                  name: semaphore-secret
                  key: MYSQL_PASSWORD
                  optional: false

            - name: MYSQL_ROOT_PASSWORD
              valueFrom:
                secretKeyRef:
                  name: semaphore-secret
                  key: MYSQL_ROOT_PASSWORD
                  optional: false
          image: mysql
          name: mysql
          volumeMounts:
          - name: semaphore-db-vol
            mountPath: /var/lib/mysql
          ports:
          - containerPort: 3306


        - env:
            - name: SEMAPHORE_ADMIN
              valueFrom:
                secretKeyRef:
                  name: semaphore-secret
                  key: SEMAPHORE_ADMIN
                  optional: false

            - name: SEMAPHORE_ADMIN_NAME
              valueFrom:
                secretKeyRef:
                  name: semaphore-secret
                  key: SEMAPHORE_ADMIN_NAME
                  optional: false

            - name: SEMAPHORE_ADMIN_PASSWORD
              valueFrom:
                secretKeyRef:
                  name: semaphore-secret
                  key: SEMAPHORE_ADMIN_PASSWORD
                  optional: false
            - name: SEMAPHORE_DB_PASS
              valueFrom:
                secretKeyRef:
                  name: semaphore-secret
                  key: SEMAPHORE_DB_PASS
                  optional: false
            - name: SEMAPHORE_DB_USER
              valueFrom:
                secretKeyRef:
                  name: semaphore-secret
                  key: SEMAPHORE_DB_USER
                  optional: false
            #Configure this if your environment has mail sending capabilities
            #- name: SEMAPHORE_ADMIN_EMAIL
            #  value: admin@localhost

            - name: POD_NAMESPACE
              valueFrom:
                fieldRef:
                  fieldPath: metadata.namespace

            - name: SEMAPHORE_DB
              value: semaphore

            - name: SEMAPHORE_DB_DIALECT
              value: mysql

            #if the DB is moved to different pod, this need to updated to service FQDN of the DB
            - name: SEMAPHORE_DB_HOST
              value: 127.0.0.1

            - name: SEMAPHORE_DB_PORT
              value: "3306"

            - name: SEMAPHORE_PLAYBOOK_PATH
              value: /tmp/semaphore
            #I am unable to make GUI work with this set, so commented this
            #- name: SEMAPHORE_WEB_ROOT
            #  value: http://127.0.0.1:3000

            # use head -c32 /dev/urandom | base64 to generate the below value
            - name: SEMAPHORE_ACCESS_KEY_ENCRYPTION
              value: Q3wYAzx89dRTZWiS11INE63Yi3hv53rJsW6raMdRdLo=
          #consider setting version
          image: ansiblesemaphore/semaphore
          name: semaphore
          ports:
            - containerPort: 3000
          resources: {}
      restartPolicy: Always
status: {}
Step 3: Expose the semaphore deployment
Expose the deployment created in the previous step as a NodePort; if your cluster supports the LoadBalancer type, feel free to use it.
apiVersion: v1
kind: Service
metadata:
  labels:
    app: semaphore
  name: semaphore
spec:
  ports:
    - name: "3000"
      port: 3000
      targetPort: 3000
  selector:
    app: semaphore
  type: NodePort
status:
  loadBalancer: {}
Testing the deployment
After finishing the above steps, the semaphore deployment should be up. You can validate this by running the below command. The below output shows that the semaphore server is running and listening on port 3000.
kubectl logs $(kubectl get pod -l app=semaphore -o name)
....
......
...........
Run Semaphore with semaphore server --config /etc/semaphore/config.json
MySQL [email protected]:3306 semaphore
Tmp Path (projects home) /tmp/semaphore
Semaphore v2.8.53
Interface
Port :3000
Server is running
Collect info required for Accessing the Web GUI
Get the NodePort and the node IP to open the web GUI. E.g.: 192.168.122.44:30492
kubectl get svc
NAME         TYPE        CLUSTER-IP    EXTERNAL-IP   PORT(S)          AGE
kubernetes   ClusterIP   10.233.0.1    <none>        443/TCP          6h42m
semaphore    NodePort    10.233.6.14   <none>        3000:30492/TCP   4m20s


kubectl get node -o wide
NAME                            STATUS   ROLES           AGE   VERSION   INTERNAL-IP       EXTERNAL-IP   OS-IMAGE             KERNEL-VERSION      CONTAINER-RUNTIME
development-kube-controller-1   Ready    control-plane   40d   v1.24.6   192.168.122.44    <none>        Ubuntu 22.04.1 LTS   5.15.0-53-generic   containerd://1.6.8
development-kube-worker-1       Ready    <none>          40d   v1.24.6   192.168.122.124   <none>        Ubuntu 22.04.1 LTS   5.15.0-53-generic   containerd://1.6.8
development-kube-worker-2       Ready    <none>          40d   v1.24.6   192.168.122.24    <none>        Ubuntu 22.04.1 LTS   5.15.0-53-generic   containerd://1.6.8
Accessing the Web GUI
Use the Username and password provided in step 1 (secret creation)

Create your first project by naming it something meaningful.

Once you click on create, a project will get created. Now, the 1st thing that is needed is a KEY. So, navigate to the Key store. Here you can store your SSH private keys, SSH passwords, tokens, vault passwords, or “None” for cloning a repository over HTTPS. In the below snippet, I am creating a key of None type.

Now, create some environment variables that must be accessible to the playbook.

Now create the repository; this could be a local file or a remote Git repo. In this example, I am using a sample repo located on GitHub.

Notice that I am using the “Access key” created earlier(None type). If you want to try the same, you can use the same repo https://github.com/technekey/sample-ansible-playbook.git

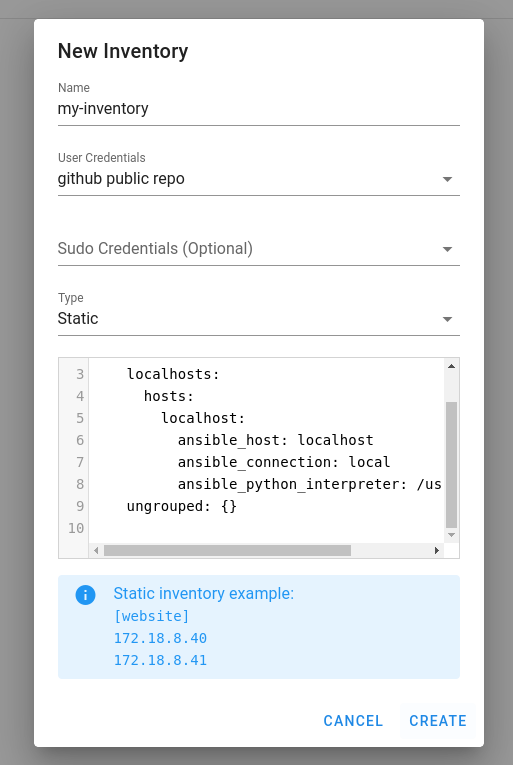
Now, the last step is to create the inventory file. You can either provide the path to the inventory or paste the file contents.
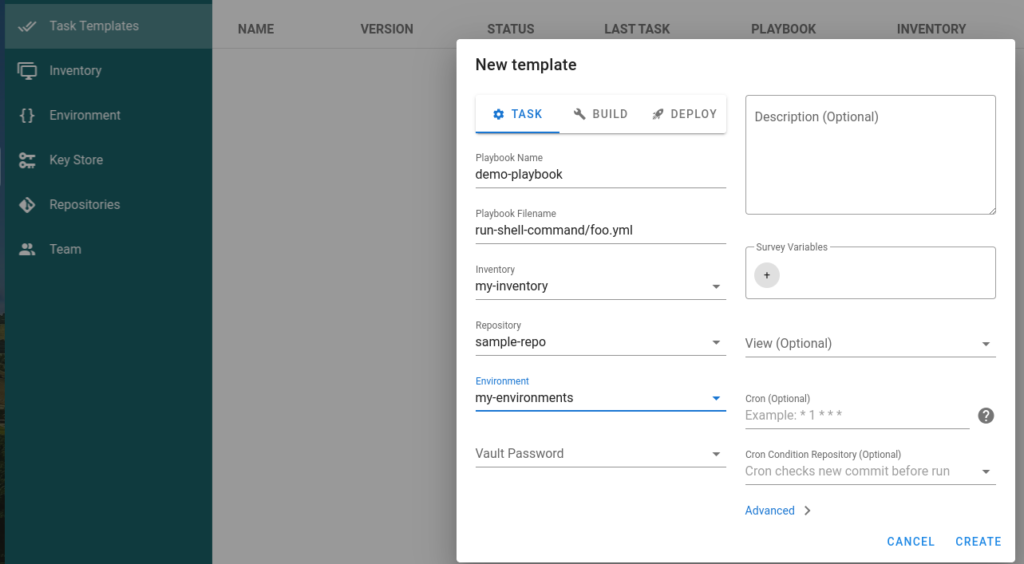
Finally, create the task template, here we will utilize all the information we created in the previous steps.
Click on the “Run” button to trigger from the GUI.

Summary and references:
- https://docs.ansible-semaphore.com/administration-guide/installation
NOTE: I have added a sample ansible.cfg file in the git repo to show that semaphore honor the ansible.cfg file.