This post will discuss Kubernetes Resources, Requests, and Limits. In the Kubernetes cluster, the scheduler chooses the best node to place a pod. To decide the best node, the scheduler makes decisions based on the availability of the resources like CPU, RAM, etc., on all the nodes. Then, the scheduler would place the Pod on the node with the highest available resources. Of course, the scheduler logic is oversimplified here, and affinity taints, etc., can skew this logic. Requests and limits are used to help the scheduler make an informed decision.
What is a resource request?
While creating a Pod, we can optionally request the CPU and memory required by the containers to perform seamlessly. E.g., we may request 1 CPU and 1024Mi Memory while creating the Pod (Container). Now scheduler places the Pod that has the requested resources available. If no node with the requested Request is available, the Pod will remain unscheduled. If multiple nodes have the requested resources available, the node with more available free resources would be selected.
“Hey Scheduler, Would you please schedule my pod on the node which have X CPU and Y Mem for my container?”
What is a resource limit?
While creating a Pod, we can optionally tell the maximum amount of resources like CPU, Memory a container may use. Setting a limit is always a good idea, as a bug in the code could cause the Container to eat up the entire amount of resources available in the node. In addition, setting a limit keeps our Container in discipline and allows other pods in the same node to have their fair share of resources.
“Hey Kubelet, Do not let my container use more than X CPU and Y Mem.”
Units used by Request and limits:
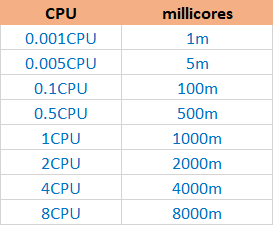
Unit for CPU:
In Kubernetes, CPU resources are measured in a UNIT called CPU. 1 CPU is equal to 1 Physical/virtual core. Interestingly Kubernetes allows users to request fractional CPU. Meaning if your Container does not need an entire core, you can request half of the CPU. To use a fractional CPU, you can use the “millicore” unit. To keep things simpler and consistent, it’s good to use CPU resources in millicores units rather than CPU. For example, if you want to use the entire 1 CPU, write it as 1000m.
Unit for Memory:
In Kubernetes, Memory is measured in bytes. But you do not have to write big numbers in bytes; you can write the Memory in Mebibytes, Megabytes, etc.E g: Mi, M, Ki, Gi, K, G, etc. The general idea is to use a consistent unit.
Example:
Resource requests and limits are set in the below example pod manifest file. For the Container named nginx, the requested resources are 1024Mi Mem and half CPU. Whereas the limit is 2048Mi Mem and 1 CPU.
apiVersion: v1
kind: Pod
metadata:
  name: sample-pod
  namespace: default
spec:
  containers:
  - name: nginx
    image: nginx
    resources:
      limits:
        memory: "2048Mi"
        cpu: "1000m"
      requests:
        memory: "1024Mi"
        cpu: "500m"
Some key rules:
- When enough resources are not available, The Pod will not get scheduled and will remain pending.(OutOfcpu or OutOfmemory state). In the example, Pod is shown in OutOfcpu and OutOfmemory state.
NAME READY STATUS     RESTARTS AGE   IP           NODE NOMINATED NODE READINESS GATES
p-3  0/1   OutOfcpu    0       3m57s              kube-worker-1
p-2  0/1   OutOfmemory 0       97s                kube-worker-1
p-1  1/1   Running     0       35s   10.233.120.2 kube-worker-1
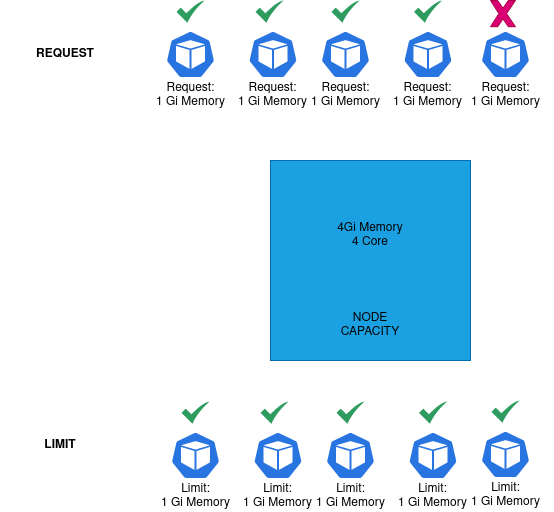
- When a Pod is requested to be scheduled, the total Request of the resources must not cross the total node capacity. Example: If a node has 4Gi of full Memory, then the sum of all the memory requests must not cross 4Gi. Any request leading to the summation of memory request crossing total node capacity will leave the new pods in an unscheduled state.
- Although, the limit is more interesting than requests. In the limit, you may overcommit the resources. The sum of the limits from all the pods scheduled on the node may cross the total node capacity. This is called resource overcommitting. This is not bad as it sounds. The chances of all the pods reaching their resource limit at the same time are rare, and when it happens, Kubernetes healing will kick in, and it will restart the pods to fix the issue. After the restart, the memory starvation on the node should get fixed.
%22%20transform%3D%22translate(1%201)%20scale(2.16406)%22%20fill-opacity%3D%22.5%22%3E%3Cellipse%20cx%3D%2224%22%20cy%3D%22138%22%20rx%3D%2269%22%20ry%3D%22140%22%2F%3E%3Cellipse%20fill%3D%22%233dbdff%22%20rx%3D%221%22%20ry%3D%221%22%20transform%3D%22matrix(-57.67504%20.20132%20-.89012%20-254.99846%20162.2%20128.7)%22%2F%3E%3Cellipse%20rx%3D%221%22%20ry%3D%221%22%20transform%3D%22matrix(20.91844%20-1.37865%204.184%2063.48434%20252.5%20117)%22%2F%3E%3Cellipse%20cx%3D%227%22%20cy%3D%22117%22%20rx%3D%2289%22%20ry%3D%2289%22%2F%3E%3C%2Fg%3E%3C%2Fsvg%3E)
- Kubernetes behave differently for CPU and Memory; when the CPU limit is crossed, the Pod is not evicted; it is throttled. Whereas when the Memory limit is crossed, Pod is evicted by calling OOM Panic. note that when the CPU has throttled, the performance of the Pod will not be good.
Pod Priority:
As the name suggests, all pods are associated with some priority in the cluster. This Priority can be set during the pod creation. The Priority value is scaled in 32bit int; the higher the value, the higher the Priority. By default, Kubernetes comes with a few priority classes like system-cluster-critical and system-node-critical, etc. The priority class object provides users a way to define the custom priority of the various pods. The Priority and the QoS will help decide the order of eviction if the node resources are starved.
kubectl get priorityclasses
NAME                    VALUE      GLOBAL-DEFAULT AGE
k8s-cluster-critical    1000000000 false          9d
system-cluster-critical 2000000000 false          9d
system-node-critical    2000001000 false          9d
We can create our priority class using below template:
apiVersion: scheduling.k8s.io/v1
kind: PriorityClass
metadata:
  name: low-priority
value: 500000
globalDefault: false
description: "Using this prioriy class would cause pods to have less priority"
Now set the priority class in the Pod:
apiVersion: v1
kind: Pod
metadata:
  name: nginx
  labels:
    env: test
spec:
  containers:
  - name: nginx
    image: nginx
    imagePullPolicy: IfNotPresent
  priorityClassName: low-priority
Preemption:
When a Pod with higher PriorityClass needs to be scheduled on a node with insufficient resources, a pod with lower Priority will be preempted. For example, the following events would be seen when describing the evicted pod.
  Warning  Preempting  21s    kubelet  Preempted in order to admit critical Pod
  Normal   Killing     19s    kubelet  Stopping container app
QoS Class:
In Kubernetes, the Pods are classified into three classes based on the type of requests and limits.
- Guaranteed
- Burstable
- BestEffort
Guaranteed:
- Every Container in the Pod must have a memory limit and a memory request.
- For every Container in the Pod, the memory limit must equal the memory request.
- Every Container in the Pod must have a CPU limit and a CPU request.
- For every Container in the Pod, the CPU limit must equal the CPU request.
Burstable:
- The Pod does not meet the criteria for QoS class Guaranteed.
- At least one Container in the Pod has a memory or CPU request.
BestEffort:
- The Containers in the Pod must not have any memory or CPU limits or requests.
o guess the likely order in which the kubelet ranks and evicts pods:
BestEffortorBurstablepods where the usage exceeds requests. These pods are evicted based on their Priority and how much their usage level exceeds the Request.Guaranteedpods andBurstablepods, where the usage is less than requests, are evicted last, based on their Priority.
Reference:
- https://kubernetes.io/docs/concepts/scheduling-eviction/_print/
- https://kubernetes.io/docs/concepts/scheduling-eviction/pod-priority-preemption/
- https://kubernetes.io/docs/tasks/configure-pod-container/quality-service-pod/
- https://kubernetes.io/docs/concepts/configuration/manage-resources-containers/#how-pods-with-resource-limits-are-run