This post demonstrates how load balancers help achieve higher availability of the control plane nodes in a simple cluster environment. The post targets the beginner audience; with the concepts, procedure, and testing. The same concepts apply to setting up a high-available Kubernetes cluster.
The post is divided into three parts; feel free to skip to the relevant part of the post for faster reading.
1. Designing a high available cluster.
2. Commands to the setup load balancer and reverse proxy(keepalived and haproxy)
3. Testing the setup.
Note: A high-availability configuration is not limited to this post; this post only covers one aspect of high availability in distributed systems.
PART-1: Building the higher available environment, starting with a simple setup and building on top of that setup towards a more resilient setup. Design/Theory!
setup-1: The most straightforward Configuration: Single node cluster
The following figure shows the most straightforward setup to communicate with a server running our application. (Eg: Kubernetes API-Server). Everything is running in a single node. We can talk to the server using its IP address for making REST/SSH Operations. If for some reason, the application running on the server becomes unresponsive or the server reboots, there would be a complete outage.

This configuration has a single point of failure. Therefore, this makes the configuration Okay for development but unsuitable for production.
setup-2: Using redundant servers to avoid a single point of failure
To avoid a single point of failure, we can have redundant servers. Using redundant servers will minimize the impact if one server fails to run the application or goes down. For example, if the server with IP 192.168.1.120 failed, another server (192.168.1.121) would serve the request.
However, there is a big problem with this setup. To communicate, we must make all the consumers aware of all the IP addresses. E.g., you need to deliver 192.168.1.120 and 192.168.1.121 to the end user and let the user decide which one to use; they may switch between the IP address in case of communication failure with one server. However, this way of working is highly inconvenient.
This also adds another question, what if all the users are talking to one server(192.168.1.120), not to the 2nd server(192.168.1.121). Since we have provided both IP addresses to the users, we cannot control the usage pattern, causing the wastage of resources on the 2nd server.

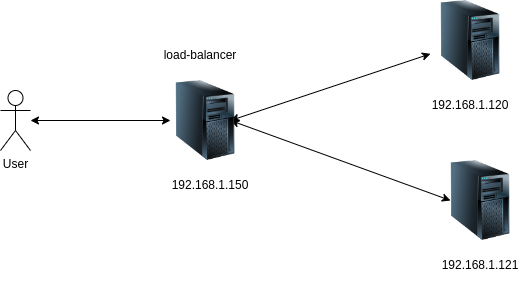
setup-3: Putting a Loadbalancer in front of the servers
A better way is to have one load-balancer in front of the backend servers. Then, the end users need to know only the load balancer address(192.168.1.150). The knowledge of address(192.168.1.120, 192.168.1.121) and number(2) of backend servers is not needed and is typically unavailable to the end users. The load balancer’s job is to make end-users believe that they are still talking to the backend server; similarly, the backend servers must believe that they are talking to the end users. The load balancer achieves this abstraction(in L4 mode) using NAT by manipulating the source and destination address in the incoming requests(packets).
The load balancer will do the heavy lifting of forwarding the requests to all the healthy backends and distributing the traffic between the backend servers. Typically the load balancers are configured to work in a round-robin fashion to keep the resource usage even among the backend servers.
In this configuration, if one server goes down(Eg: 192.168.1.120), the other backend server will still be accessible via the load balancer IP. The impact of one backend server will not be visible to the end users.
There are many load balancing solutions available, including both software and hardware. In this post, we will be using haproxy as a load balancer.
What does HAPROXY DO?
In this post, we will use HAProxy as a load balancing solution among the different backend servers. In a nutshell, it does the following:
1. Maintain the list of all the backend servers.
2. Distribute the traffic between the backend servers. Typically in a round-robin way.
However, there is still a big problem. Now, backend servers are redundant(192.168.1.120, 192.168.1.121) and resilient to failure; however, the load balancer(haproxy) is not. So if the load balancer is failed, the end user will not be able to access the backend servers, despite the backends being up and healthy.
This problem could be resolved by using multiple load balancers(haproxy); in case of failure of one load balancer, the users can connect to the backend servers using another load balancer.
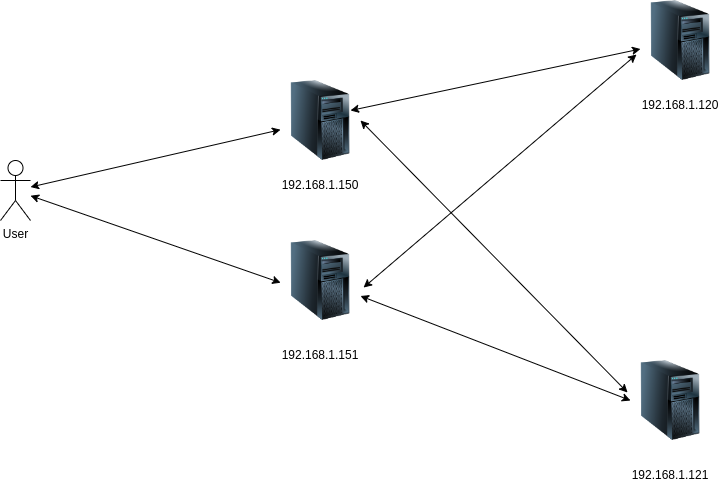
setup-4: Using Multiple load balancers(haproxy) in front of the backend servers
The setup with just one load balancer(haproxy) in front of redundant backend servers is still vulnerable to a single point of failure. To mitigate that risk, we can have multiple load balancers to expose the backend servers.
Still, there is a big problem; if we used multiple load balancers, there would be a unique IP address associated with each load balancer node(192,168.1.150, 192.168.1.151). We assume people have records of both load balancer IP addresses to connect to the backend server. There may be a subset of people who are unaware of the 2nd load balancer IP will experience the outage. This makes the handling of multiple IP addresses unsuitable.
So far, all the configurations we have discussed were not high-available as they had a single point of failure. The following setup could be considered a minimal high available setup.
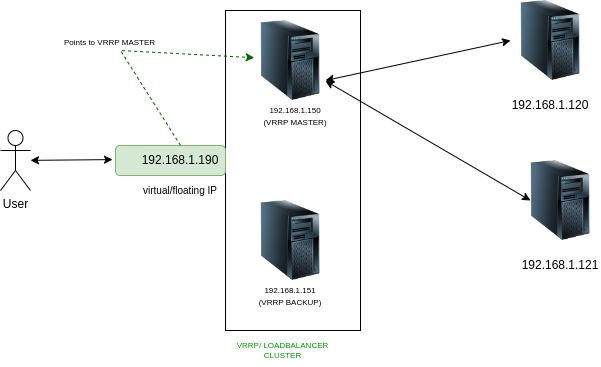
setup-5: Using Multiple Load balancers and Virtual IP to expose the backend
The problem with the previous setup(setup-4) was dealing with multiple load balancer IP addresses. Imagine having only one IP address that could point to both load balancers simultaneously. These kinds of IP addresses are called the floating IP or Virtual IPs that are not statically associated with a load balancer node but dynamically point to one of a load balancer based on some criteria. The node selection for assigning the floating IP to a particular load balancer node is made using the VRRP protocol. It is a vast topic to cover; however, in a nutshell; it does the following:
During the setup of the load balancer nodes, we figure out a spare IP(192.168.1.190) in the network and use it as floating IP for our load balancer cluster. Then we assign different priorities to each load balancer node, the load balancer with the highest priority will become VRRP master and get a Virtual IP address assigned.
Example:
load balancer-1(192.168.1.150) — assigned priority 255 — this is the highest priority — assigning the VIP 192.168.1.190 to this node
load balancer-2(192.168.1.151) — assigned priority 254
…..
Now, all the load balancers will regularly advertise that they are healthy and can connect to the backend serversSupposeSuppose any load balancer did not advertise or inform that its connectivity to the backend is d. In that case,n that case, the priority of that load balancer will be decreased(for example, by 2 points) and effectively make another load balancer VRRP MASTER. This would assign virtual IP to the other load balancer. Until the previous VRRP master(load balancer) did not start advertising again with confirmation that it can connect to the backend server, it will remain as a VRRP backup.
Even if the one backend is down and one load balancer is down, the user will still be able to reach the backend using the remaining load balancer via VIP(192.168.1.190) with minimal or no visible impact on the end-user experience.
How to create the virtual IP, and what does keepalived do?
Multiple solutions are available to create the virtual IP and associate it with one of the load balancers. However, in this post, we will be using “keepalived.” Keepalived is a software(load balancing solution) that runs on the load balancer nodes and performs the following functions(but are not limited to this list):
1. Determining the VRRP MASTER: Using VRRP protocol keepalived determines a VRRP MASTER from the pool of load balancer nodes. For example, In the above diagram, it’s 192.168.1.150.
2. Assigning the VIP: Assign the Virtual IP address to the interface of the VRRP MATER Node. If we refer to the above diagram, the VIP points to the VRRP MASTER node. If there is a failover from the VRRP MASTER node, the other load balancer node will be made a new VRRP master, and the VIP will point to the new VRRP MASTER node.
3. Monitoring for VRRP Failover: Monitor the health of the load balancer nodes, using periodic VRRP advertisements, and do the failover to another load balancer if the master load balancer goes down or cannot connect to the backend server. This is done by increasing/decreasing the VRRP priority. The priority is defined in the keepalived configuration file.
The summary of responsibilities of keepalived vs. haproxy(high-level) :
| keepalived | haproxy |
| 1. Ensure that at least one load balancer node is accessible to the end users via the virtual IP. 2. If one load balancer node fails, keepalived will move the VIP to another load balancer node, with minimal end-user impact. 3. keepalived will test the connectivity between the load balancer node and the backend. If the connectivity is down, a failover will happen to another load balancer node even when the concerned load balancer is up. 4. Optionally, Keepalived continuously checks that the Current VRRP master node can satisfy the application level communication to be called a VRRP master; otherwise, there would be a failover. For example, if you have an HTTP server running on the backend, then the VRRP master must be able to communicate over configured HTTP endpoint. | 1. Distribute the traffic between the pool of the backend servers. Typically in a round-robin fashion. 2. In the HTTP mode(Or L7 mode), haproxy can manage the TLS termination of the incoming traffic. The profit of this mode is that data caching is available, but communication is not end-to-end TLS. TLS terminates at the load balancer node. 3. In TCP mode(Or L4 mode), haproxy will forward the packet to its destination without managing the SSL. In this case, TLS termination, if needed, is done at the backend server. No caching is available, but end-to-end TLS is available. |
PART-2: Procedure to setup load balancers using keepalived and haproxy
In this part, we will see the simplest example of using keepalived and HaProxy.
step-0: Create the required nodes
I am using the following node setup as shown in the diagram:
1. Two load balancer nodes, we will install and configure haproxy and keepalived on these nodes.
2. Two backend server nodes, we will run an apache webserver on these nodes.

step-1: Figure out the virtual IP to use
In your network, you will have to come up with a spare IP that is currently not assigned to any node, and we will use that IP as the virtual IP for the keepalived cluster.
I will use 192.168.122.211 as my virtual IP as it is not assigned to any other VM in my network. So following is the layout at the start of the procedure.
 Name       MAC address          Protocol     Address                             Id   Name             State
-------------------------------------------------------------------------------  --------------------------------
 vnet13     52:54:00:ba:89:bb    ipv4         192.168.122.112/24                  14   webserver-1      running
 vnet14     52:54:00:ab:5c:6d    ipv4         192.168.122.197/24                  15   webserver-2      running
 vnet15     52:54:00:d6:78:8f    ipv4         192.168.122.48/24                   16   loadbalancer-1   running
 vnet16     52:54:00:32:42:00    ipv4         192.168.122.97/24                   17   loadbalancer-2   running

#VIRTUAL IP I CHOOSE TO USE IS 192.168.122.211 as it is not assigned to any other nodes.
Step-2: Installing the haproxy and keepalived on both load balancer nodes.
You can find official documentation for haproxy installation here. The official installation procedure for keepalived is present here. However, TLDR, execute the below command on your load balancer nodes.
Note that there are instances where keepalived installed from the package managers(like apt) are not up to date. Considering it for production? Consider building it from the source.
#install haproxy
sudo apt-get update
sudo apt-get upgrade
sudo apt install haproxy -y

#install keepalived, it will go to loaded state not running state.
sudo apt install keepalived -y
Step-3: Configure keepalived at /etc/keepalived/keepalived.conf
Copy the following content to /etc/keepalived/keepalived.conf in load balancer node. This file will be the same in all the load balancer instances except:
1. state would be BACKUP for all the secondary load balancers.
2. Priority would be lesser in all the secondary load balancer nodes. For example, if the MASTER node is set 255 as a priority, then subsequent load balancers should have 254, 253,243…etc.
#vi /etc/keepalived/keepalived.conf

global_defs {
router_id LVS_DEVEL
script_user root
enable_script_security

}
vrrp_script check_apiserver {
  script "/etc/keepalived/check_apiserver.sh"
  interval 3
  weight -2
  fall 10
  rise 2
}

vrrp_instance VI_1 {
    state MASTER
    interface enp1s0
    virtual_router_id 51
    priority 255
    authentication {
    auth_type PASS
    auth_pass mypass
    }
    virtual_ipaddress {
        192.168.122.211/24
    }
    track_script {
        check_apiserver
    }
    notify_master "/etc/keepalived/status_capture.sh MASTER"
    notify_backup "/etc/keepalived/status_capture.sh BACKUP"
    notify_fault  "/etc/keepalived/status_capture.sh FAULT"
}
step-4: Create a keepalived check script(track_script block in the config)
The Custom logic for the health check, keepalived check script could be any program/script/command to ensure that the VRRP Master node can connect to the application. This script helps detect scenarios where the VRRP Master load balancer node is up but unable to communicate with the backend servers. For example, We need to ensure that a GET request on an HTTP endpoint is working fine for an HTTP server running on the backend servers.
The following check is written in /etc/keepalived/check_apiserver.sh file. In real-world scenarios, this check could be very complex but fast.
#vi /etc/keepalived/check_apiserver.sh

#!/bin/sh

VIP=192.168.122.211
LB_BINDED_PORT=80

errorExit() {
    echo "*** $*" 1>&2
    exit 1
}


#if the VIP is associated with the interface of this loadbalancer node, then it means this is a VRRP master loadbalancer
# so from here, the backend applications should be accissible via VIP
if ip addr | grep -q $VIP; then
    curl --silent --max-time 2  $VIP:$LB_BINDED_PORT/ -o /dev/null || errorExit "Error GET to $VIP on $LB_BINDED_PORT"
fi
Step-5: Create a notify script.(notify_master/notify_backup/notify_fault block in the config)
This is an optional step, but to showcase that based on VRRP State Transition(MASTER<->BACKUP), we can trigger some action defined in the notify script. For example, if the load balancer running this script transitions to MASTER, the notify_master block will get called, and this script will be triggered with “MASTER” as 1st argument to the script. This is a dummy script writing the status of the load balancer to /tmp/load-balancer-status file.
Create a file /etc/keepalived/status_capture.sh with the following data:
#vi /etc/keepalived/status_capture.sh

#!/bin/bash

echo "$(date): The loadbalancer instance running on $(hostname) is currently marker $1" |tee /tmp/load-balancer-status
chmod 755 /tmp/load-balancer-status || true
Step-6: Make the scripts executable
sudo chmod u+x  /etc/keepalived/check_apiserver.sh
sudo chmod u+x  /etc/keepalived/status_capture.sh
step-7: Allow the VIP to bind on the load balancer nodes where the VIP is not present
There would be only one VRRP Master node at any time, so the VIP will be associated with that node. Since the VIP is unavailable on the VRRP backup node, the bind will fail on the backup load balancer nodes. The bind failure can be prevented by allowing nonlocal binding. Run the following command on all the load balancer nodes.
echo 'net.ipv4.ip_nonlocal_bind=1'|sudo tee -a /etc/sysctl.conf
sudo sysctl -p
Step-8: Configure the haproxy configuration file with backend info
Modify the file at /etc/haproxy/haproxy.cfg and add the following information. You need to copy the same info in both the load balancers. In this file, we are making haproxy aware of both the backend server and the ports the backend servers are accepting traffic.
In the frontend and backend sections, we are providing information such as input source, output destination, and balancing technique to the haproxy, Example:
1. The haproxy will start listening for the traffic on the value provided in the “bind” field.
2. Similarly, in the backend section, we provide the list of the backend servers and ports for forwarding the traffic.
3. There could be multiple frontends and backends in the single file. Each pair of the frontend and backend are connected via the keyword(tag) after them. E.g., “apiserver” in the below example. The frontend tagged apiserver will forward traffic to the backed section “apiserver.”
4. Here, the mode used is TCP/L4. This means the load balancer is not reading the packet and just forwarding it to the final destination by manipulating the source and destination address. This is done to avoid doing TLS termination on the load balancer.
Note: this is probably the most straightforward configuration for Haproxy. You can read through the official documentation for move advanced options.
#vi /etc/haproxy/haproxy.cfg
defaults
  mode tcp
  timeout connect 10s
  timeout client 30s
  timeout server 30s

frontend apiserver
  #You can either bind only the VIP by using "bind VIP:80" OR "bind *:80" to forward all the HTTP traffic to the backend.
  bind 192.168.122.211:80
  # we will simply forward the packet at L4 level
  mode tcp
  option tcplog
  log 127.0.0.1 local0
  default_backend apiserver

backend apiserver
  mode tcp
  balance     roundrobin
  # In real world, you will find tcp-check for performing a more resiliant check
  server backend-1 192.168.122.112:80  check
  server backend-2 192.168.122.197:80 check
Step-9: Repeat the previous steps on all the other load balancer nodes
Repeat Step-2 to Step-8 on all the load balancer nodes; note that for step-3, where we have created /etc/keepalived/keepalived.conf, make sure to adjust the priority and state to a lower priority and BACKUP state for all the secondary load balancers.
Step-7: Restart the HAPROXY and KEEPALIVED on both load balancer nodes.
#enable and start keepalived on loadbalancer-1

technekey@loadbalancer-1:~$ sudo service keepalived start
technekey@loadbalancer-1:~$ sudo service keepalived status

#enable and start haproxy on loadbalancer-1

technekey@loadbalancer-1:~$ sudo service haproxy start
technekey@loadbalancer-1:~$ sudo service haproxy status

#enable and start keepalived on loadbalancer-2

technekey@loadbalancer-2:~$ sudo service keepalived start
technekey@loadbalancer-2:~$ sudo service keepalived status

#enable and start haproxy on loadbalancer-2

technekey@loadbalancer-2:~$ sudo service haproxy start
technekey@loadbalancer-2:~$ sudo service haproxy status
Part-3: Testing the setup; setup is finished, and you are good to go! next step is optional for learning
Change the index.html to be clean and obvious.
In this part of the post, we will test whether the setup done by us in the previous state is working on not. We will add custom notes to index.html of both backend servers so we can quickly figure out which backend server responder.
webserver-1:$ echo "<h1>This is coming from backend webserver-1" |sudo tee  /var/www/html/index.html
webserver-2:$ echo "<h1>This is coming from backend webserver-2</h1>" |sudo tee  /var/www/html/index.html
Test-1: Let’s do curl from our workstation to the VIP
Notice that when we curl the VIP of the load balancer, the load balancers forward requests to both backend servers in a round-robin fashion.
technekey@controller:~$ while true; do printf "$(date) "; curl  --max-time 2 192.168.122.211 ;sleep 1;done
Wed Jul 20 04:13:44 PM CDT 2022 <h1> This is coming from backend webserver-2</h1>
Wed Jul 20 04:13:45 PM CDT 2022 <h1> This is coming from backend webserver-1</h1>
Wed Jul 20 04:13:46 PM CDT 2022 <h1> This is coming from backend webserver-2</h1>
Wed Jul 20 04:13:47 PM CDT 2022 <h1> This is coming from backend webserver-1</h1>
Wed Jul 20 04:13:48 PM CDT 2022 <h1> This is coming from backend webserver-2</h1>
Wed Jul 20 04:13:49 PM CDT 2022 <h1> This is coming from backend webserver-1</h1>
Wed Jul 20 04:13:50 PM CDT 2022 <h1> This is coming from backend webserver-2</h1>
Test-2: Let’s take down one of the backend servers.
In the below command, I am running curl in a while loop with a sleep of 1 second; you can notice that I shut down the backend-1 around Jul 18 at 03:37:00, and I started to get the timeout a few times later. After a few(3) failures, all the traffic is automatically moved to backend-2.
while true; do printf "$(date) "; curl  --max-time  2 192.168.122.211;sleep 1; done
Wed Jul 20 04:15:24 PM CDT 2022 <h1> This is coming from backend webserver-2</h1>
Wed Jul 20 04:15:25 PM CDT 2022 <h1> This is coming from backend webserver-1</h1>
Wed Jul 20 04:15:26 PM CDT 2022 <h1> This is coming from backend webserver-2</h1>
Wed Jul 20 04:15:27 PM CDT 2022 <h1> This is coming from backend webserver-1</h1>
Wed Jul 20 04:15:28 PM CDT 2022 <h1> This is coming from backend webserver-2</h1>
Wed Jul 20 04:15:29 PM CDT 2022 <h1> This is coming from backend webserver-1</h1>
Wed Jul 20 04:15:30 PM CDT 2022 <h1> This is coming from backend webserver-2</h1>
Wed Jul 20 04:15:31 PM CDT 2022 <h1> This is coming from backend webserver-1</h1>
Wed Jul 20 04:15:32 PM CDT 2022 <h1> This is coming from backend webserver-2</h1>
Wed Jul 20 04:15:33 PM CDT 2022 <h1> This is coming from backend webserver-1</h1>
Wed Jul 20 04:15:34 PM CDT 2022 <h1> This is coming from backend webserver-2</h1>
Wed Jul 20 04:15:35 PM CDT 2022 <h1> This is coming from backend webserver-1</h1>
Wed Jul 20 04:15:36 PM CDT 2022 <h1> This is coming from backend webserver-2</h1>
Wed Jul 20 04:15:37 PM CDT 2022 <h1> This is coming from backend webserver-1</h1>
Wed Jul 20 04:15:38 PM CDT 2022 <h1> This is coming from backend webserver-2</h1>
Wed Jul 20 04:15:39 PM CDT 2022 <h1> This is coming from backend webserver-1</h1>
Wed Jul 20 04:15:40 PM CDT 2022 <h1> This is coming from backend webserver-2</h1>
Wed Jul 20 04:15:41 PM CDT 2022 <h1> This is coming from backend webserver-1</h1>
Wed Jul 20 04:15:42 PM CDT 2022 <h1> This is coming from backend webserver-2</h1>

#Around here, I shutdown backend-1, haproxy took a few seconds to detect&remove from rotation

Wed Jul 20 04:15:43 PM CDT 2022 curl: (28) Operation timed out after 2000 milliseconds with 0 bytes received
Wed Jul 20 04:15:46 PM CDT 2022 <h1> This is coming from backend webserver-2</h1>
Wed Jul 20 04:15:47 PM CDT 2022 curl: (28) Operation timed out after 2001 milliseconds with 0 bytes received
Wed Jul 20 04:15:50 PM CDT 2022 <h1> This is coming from backend webserver-2</h1>
Wed Jul 20 04:15:51 PM CDT 2022 curl: (28) Operation timed out after 2001 milliseconds with 0 bytes received
# Notice , now haproxy is not attempting to send traffic to webserver-1
Wed Jul 20 04:15:54 PM CDT 2022 <h1> This is coming from backend webserver-2</h1>
Wed Jul 20 04:15:55 PM CDT 2022 <h1> This is coming from backend webserver-2</h1>
Wed Jul 20 04:15:56 PM CDT 2022 <h1> This is coming from backend webserver-2</h1>
Wed Jul 20 04:15:57 PM CDT 2022 <h1> This is coming from backend webserver-2</h1>
Wed Jul 20 04:15:58 PM CDT 2022 <h1> This is coming from backend webserver-2</h1>
Wed Jul 20 04:15:59 PM CDT 2022 <h1> This is coming from backend webserver-2</h1>
Wed Jul 20 04:16:00 PM CDT 2022 <h1> This is coming from backend webserver-2</h1>
Wed Jul 20 04:16:01 PM CDT 2022 <h1> This is coming from backend webserver-2</h1>
Wed Jul 20 04:16:02 PM CDT 2022 <h1> This is coming from backend webserver-2</h1>

...
......
#around here, I started webserver-1 again, within few seconds its back in haproxy rotation
Wed Jul 20 04:17:57 PM CDT 2022 <h1> This is coming from backend webserver-2</h1>
Wed Jul 20 04:17:58 PM CDT 2022 <h1> This is coming from backend webserver-2</h1>
Wed Jul 20 04:17:59 PM CDT 2022 <h1> This is coming from backend webserver-2</h1>
Wed Jul 20 04:18:00 PM CDT 2022 <h1> This is coming from backend webserver-2</h1>
Wed Jul 20 04:18:01 PM CDT 2022 <h1> This is coming from backend webserver-2</h1>
Wed Jul 20 04:18:02 PM CDT 2022 <h1> This is coming from backend webserver-2</h1>
Wed Jul 20 04:18:03 PM CDT 2022 <h1> This is coming from backend webserver-2</h1>
Wed Jul 20 04:18:04 PM CDT 2022 <h1> This is coming from backend webserver-2</h1>
Wed Jul 20 04:18:05 PM CDT 2022 <h1> This is coming from backend webserver-2</h1>
Wed Jul 20 04:18:06 PM CDT 2022 <h1> This is coming from backend webserver-2</h1>
Wed Jul 20 04:18:07 PM CDT 2022 <h1> This is coming from backend webserver-2</h1>
Wed Jul 20 04:18:08 PM CDT 2022 <h1> This is coming from backend webserver-2</h1>
Wed Jul 20 04:18:09 PM CDT 2022 <h1> This is coming from backend webserver-2</h1>
Wed Jul 20 04:18:10 PM CDT 2022 <h1> This is coming from backend webserver-2</h1>
Wed Jul 20 04:18:11 PM CDT 2022 <h1> This is coming from backend webserver-2</h1>
Wed Jul 20 04:18:12 PM CDT 2022 <h1> This is coming from backend webserver-2</h1>
Wed Jul 20 04:18:13 PM CDT 2022 <h1> This is coming from backend webserver-1</h1>
Wed Jul 20 04:18:14 PM CDT 2022 <h1> This is coming from backend webserver-2</h1>
Wed Jul 20 04:18:15 PM CDT 2022 <h1> This is coming from backend webserver-1</h1>
Wed Jul 20 04:18:16 PM CDT 2022 <h1> This is coming from backend webserver-2</h1>
Wed Jul 20 04:18:17 PM CDT 2022 <h1> This is coming from backend webserver-1</h1>
Test-3: Let’s take down the Master load balancer, which has the VIP
while true; do printf "$(date) "; curl  --max-time  2 192.168.122.211;sleep 1; done
Wed Jul 20 04:19:17 PM CDT 2022 <h1> This is coming from backend webserver-2</h1>
Wed Jul 20 04:19:18 PM CDT 2022 <h1> This is coming from backend webserver-1</h1>
Wed Jul 20 04:19:19 PM CDT 2022 <h1> This is coming from backend webserver-2</h1>
Wed Jul 20 04:19:20 PM CDT 2022 <h1> This is coming from backend webserver-1</h1>
Wed Jul 20 04:19:21 PM CDT 2022 <h1> This is coming from backend webserver-2</h1>
Wed Jul 20 04:19:22 PM CDT 2022 <h1> This is coming from backend webserver-1</h1>
Wed Jul 20 04:19:23 PM CDT 2022 <h1> This is coming from backend webserver-2</h1>
Wed Jul 20 04:19:24 PM CDT 2022 <h1> This is coming from backend webserver-1</h1>
Wed Jul 20 04:19:25 PM CDT 2022 <h1> This is coming from backend webserver-2</h1>
Wed Jul 20 04:19:26 PM CDT 2022 <h1> This is coming from backend webserver-1</h1>
Wed Jul 20 04:19:27 PM CDT 2022 <h1> This is coming from backend webserver-2</h1>
Wed Jul 20 04:19:28 PM CDT 2022 <h1> This is coming from backend webserver-1</h1>
#around this time, I took down the VRRP master node, traffic impact is only noded in 1 attempt
Wed Jul 20 04:19:29 PM CDT 2022 <h1> This is coming from backend webserver-2</h1>
Wed Jul 20 04:19:31 PM CDT 2022 curl: (28) Connection timed out after 2001 milliseconds
Wed Jul 20 04:19:34 PM CDT 2022 <h1> This is coming from backend webserver-2</h1>
Wed Jul 20 04:19:35 PM CDT 2022 <h1> This is coming from backend webserver-2</h1>
Wed Jul 20 04:19:36 PM CDT 2022 <h1> This is coming from backend webserver-1</h1>
Wed Jul 20 04:19:37 PM CDT 2022 <h1> This is coming from backend webserver-2</h1>
Wed Jul 20 04:19:38 PM CDT 2022 <h1> This is coming from backend webserver-2</h1>
Wed Jul 20 04:19:39 PM CDT 2022 <h1> This is coming from backend webserver-1</h1>
Wed Jul 20 04:19:40 PM CDT 2022 <h1> This is coming from backend webserver-2</h1>
Other miscellaneous info:
You can check the status of the VRRP Mastershipt using the following command; the last log shows that the keepalived instance running on loadbalancer-2 is transitioning into master.
technekey@loadbalancer-2:~$ service keepalived status
● keepalived.service - Keepalive Daemon (LVS and VRRP)
     Loaded: loaded (/lib/systemd/system/keepalived.service; enabled; vendor preset: enabled)
     Active: active (running) since Wed 2022-07-20 21:15:40 UTC; 5min ago
   Main PID: 594 (keepalived)
      Tasks: 2 (limit: 1119)
     Memory: 7.8M
        CPU: 702ms
     CGroup: /system.slice/keepalived.service
             ├─594 /usr/sbin/keepalived --dont-fork
             └─645 /usr/sbin/keepalived --dont-fork

Jul 20 21:15:40 loadbalancer-2 Keepalived[594]: Command line: '/usr/sbin/keepalived' '--dont-fork'
Jul 20 21:15:40 loadbalancer-2 Keepalived[594]: Configuration file /etc/keepalived/keepalived.conf
Jul 20 21:15:40 loadbalancer-2 Keepalived[594]: NOTICE: setting config option max_auto_priority should result in better keepalived performance
Jul 20 21:15:40 loadbalancer-2 systemd[1]: keepalived.service: Got notification message from PID 645, but reception only permitted for main PID 594
Jul 20 21:15:40 loadbalancer-2 Keepalived[594]: Starting VRRP child process, pid=645
Jul 20 21:15:40 loadbalancer-2 Keepalived[594]: Startup complete
Jul 20 21:15:40 loadbalancer-2 systemd[1]: Started Keepalive Daemon (LVS and VRRP).
Jul 20 21:15:40 loadbalancer-2 Keepalived_vrrp[645]: (VI_1) Entering BACKUP STATE (init)
Jul 20 21:15:40 loadbalancer-2 Keepalived_vrrp[645]: VRRP_Script(check_apiserver) succeeded
Jul 20 21:19:32 loadbalancer-2 Keepalived_vrrp[645]: (VI_1) Entering MASTER STATE
Remember the notify script we set in the keepalived config.
# we have dumped this dynamic data from notify_master script we configured in keepalived.conf
cat /tmp/load-balancer-status
Wed Jul 20 21:19:32 UTC 2022: The loadbalancer instance running on loadbalancer-2 is currently marker MASTER