In Kubernetes with the default configurations, When a deployment is exposed via a service, the traffic is distributed between the endpoints/replicas in a round-robin way. This is great for most cases; however, the cluster administrator sometimes wants a finer traffic distribution control.
Kubernetes provided a few more strategies for traffic distribution among the service’s endpoints. In this post, we will be touching that area on the surface with a simple Nginx example.
- Environment setup:
- What does Kube-proxy do?
- Pre-requisites: Kube-proxy mode!
- Step-1: Check the existing Kube-proxy mode
- Step-2: Check the existing IPVS configuration
- Step-3: getting to know the possible load balancing strategies for IPVS
- Step-4: Verify that the round-robin is working without any changes
- Step-5: Now change from round-robin(rr) toNever Queue(nq)
- Step-6: Reload the Kube-proxy daemonset to let your changes reflect
- Step-7: Simulate a TCP flood on one of the worker nodes where web server pod is running
- Summary:
Environment setup:
We will set up a deployment with three replicas and expose it using a clusterIP service. In a later section of this post, we will use this service and deployment to showcase how we can tweak the traffic behavior. You can skip to the relevant area if you do not want to follow the steps.
Step-1: Creating a simple nginx deployment
We will use the following YAML file for the deployment creation; note that for ease of explanation, I have modified the index.html of the pods so that they will display some unique identifiers like pod name, pod IP, and node name.
apiVersion: apps/v1
kind: Deployment
metadata:
  creationTimestamp: null
  labels:
    app: webserver
  name: webserver
spec:
  replicas: 3
  selector:
    matchLabels:
      app: webserver
  strategy: {}
  template:
    metadata:
      creationTimestamp: null
      labels:
        app: webserver
    spec:
      containers:
      - name: nginx
        image: nginx
        volumeMounts:
        - name: workdir
          mountPath: /usr/share/nginx/html

      initContainers:
      - name: install
        image: busybox:1.28
        env:
        - name: POD_IP
          valueFrom:
            fieldRef:
              fieldPath: status.podIP

        - name: NODE_NAME
          valueFrom:
            fieldRef:
              fieldPath: spec.nodeName

        - name: POD_NAME
          valueFrom:
            fieldRef:
              fieldPath: metadata.name

        command:
        - 'sh'
        - '-c'
        - 'printf "%-30s %-30s %-30s\n" "POD_NAME: $(POD_NAME)", "POD_IP: $(POD_IP)", "NODE_NAME: $(NODE_NAME)" > /work-dir/index.html'
        volumeMounts:
        - name: workdir
          mountPath: "/work-dir"
      dnsPolicy: Default
      volumes:
      - name: workdir
        emptyDir: {}
kubectl get deployments.apps
NAME        READY   UP-TO-DATE   AVAILABLE   AGE
webserver   3/3     3            3           27m
Verify the pod status and their IP addresses.
k get pod -o wide -l app=webserver
NAME                         READY   STATUS    RESTARTS   AGE   IP               NODE                        NOMINATED NODE   READINESS GATES
webserver-6958558dd8-k2mp5   1/1     Running   0          31m   10.233.114.143   development-kube-worker-3   <none>           <none>
webserver-6958558dd8-r66xl   1/1     Running   0          31m   10.233.102.226   development-kube-worker-1   <none>           <none>
webserver-6958558dd8-t2qw9   1/1     Running   0          31m   10.233.83.217    development-kube-worker-2   <none>           <none>
Step-2: Expose the deployment as a clusterIP service
kubectl expose deployment webserver --type ClusterIP --port 80 --name webserver
Verify the service and the endpoints:
kubectl get svc  webserver
NAME        TYPE        CLUSTER-IP      EXTERNAL-IP   PORT(S)   AGE
webserver   ClusterIP   10.233.50.141   <none>        80/TCP    82m

#notice the endpoints are the IP address of the pods created.
kubectl get endpoints webserver
NAME        ENDPOINTS                                              AGE
webserver   10.233.102.226:80,10.233.114.143:80,10.233.83.217:80   83m
Now the setup is ready for showcasing the traffic distribution.
What does Kube-proxy do?
Kube-proxy is a network proxy running on all the nodes of the Kubernetes cluster(via daemon sets). Kube-proxy uses IPTABLES and IPVS load balancing technologies(modes) for the routing the incoming packet to the correct pod.
For example:
When you try to reach a backend pod using a service(<servicename>.<namespace>.svc) exposing it, then Kube-proxy does the magic of letting the pod reach the right destination.
Another example:
When you try to connect to a nodePort service and use any node’s IP, but you still reach the right pod; it’s the Kube-proxy doing the heavy lifting in the background.

Pre-requisites: Kube-proxy mode!
To change the load balancing strategy from round-robin to anything else, the kube-proxy must be running in IPVS mode. We will cover how to check the mode and how to update it. Initially, the Kube-proxy mode depends on how the cluster is bootstrapped; the following are the two possible values:- iptables
- ipvs
If your cluster is running in iptables Mode, you have the following two choices:
– change the mode from iptables to IPVS, covered later in this post.
– live your life with a round-robin balancing strategy.
Step-1: Check the existing Kube-proxy mode
The Kube-proxy running in my cluster is running in IPVS mode. You can remove the grep and dump the entire configuration if needed.
#I am running my cluster in IPVS mode.
kubectl get cm -n kube-system  kube-proxy -o jsonpath='{.data.config\.conf}{"\n"}' |grep mode
mode: ipvs
Step-2: Check the existing IPVS configuration
You can use the below command to dump the configured parameters for ipvs. You will get the balancing strategy at "ipvs.scheduler: rr“, here “rr” means round-robin.
kubectl get cm -n kube-system  kube-proxy -o jsonpath='{.data.config\.conf}{"\n"}' |grep -ozP '(?s)ipvs:.*?(?=kind:)'
ipvs:
  excludeCIDRs: []
  minSyncPeriod: 0s
  scheduler: rr                              #<----rr here means round-robin
  strictARP: false
  syncPeriod: 30s
  tcpFinTimeout: 0s
  tcpTimeout: 0s
  udpTimeout: 0s
Step-3: getting to know the possible load balancing strategies for IPVS
IPVS provides more options for balancing traffic to backend Pods; You can read more about these here and here for the scheduling algorithms.
rr: round-robin
Robin Robin: distributes jobs equally amongst the available real servers.lc: least connection (smallest number of open connections)
Least-Connection: assigns more jobs to real servers with fewer active jobs.dh: destination hashing
Destination Hashing: assigns jobs to servers by looking up a statically assigned hash table by their destination IP addresses.sh: source hashing
Source Hashing: assigns jobs to servers by looking up a statically assigned hash table by their source IP addresses.sed: shortest expected delay
Shortest Expected Delay: assigns an incoming job to the server with the shortest expected delay. The expected delay that the job will experience is (Ci + 1) / Ui if sent to the ith server, in which Ci is the number of jobs on the ith server and Ui is the fixed service rate (weight) of the ith server.nq: never queue
Never Queue: assigns an incoming job to an idle server if there is, instead of waiting for a fast one; if all the servers are busy, it adopts the Shortest Expected Delay policy to assign the job.
Step-4: Verify that the round-robin is working without any changes
You may notice that traffic is distributed among the pod replica of the deployment in the following pattern and repeat.- pod ip: 10.233.114.143
- pod ip: 10.233.114.217
- pod ip: 10.233.114.226
#I create a test pod to curl
kubectl run ubuntu --image ubuntu --command sleep infinity
root@ubuntu:/#apt update -y
root@ubuntu:/#apt install curl

#continously curl to the service FQDN
while true; do k exec -it curl-pod  -- curl webserver.default.svc ;sleep 1;done
POD_NAME: webserver-6958558dd8-k2mp5, POD_IP: 10.233.114.143,        NODE_NAME: development-kube-worker-3
POD_NAME: webserver-6958558dd8-t2qw9, POD_IP: 10.233.83.217,         NODE_NAME: development-kube-worker-2
POD_NAME: webserver-6958558dd8-r66xl, POD_IP: 10.233.102.226,        NODE_NAME: development-kube-worker-1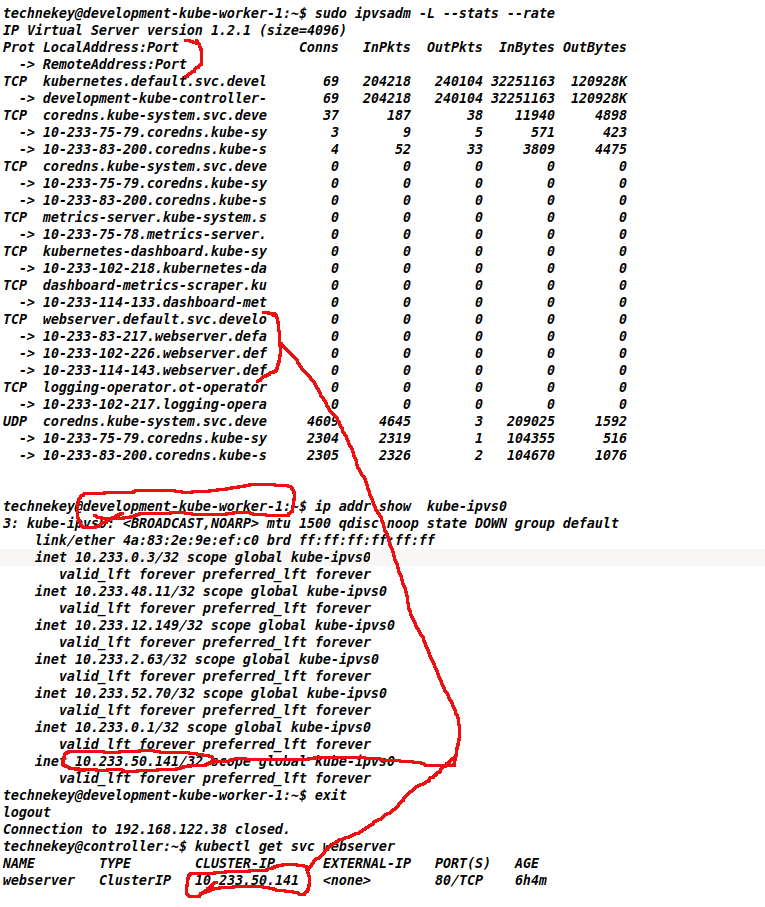
Step-5: Now change from round-robin(rr) toNever Queue(nq)
We know Kube-proxy is a daemonset, and its configuration is stored in kube-proxy configmap. So let’s update it.
kubectl get daemonsets.apps  -n kube-system
NAME           DESIRED   CURRENT   READY   UP-TO-DATE   AVAILABLE   NODE SELECTOR            AGE
calico-node    4         4         4       4            4           kubernetes.io/os=linux   4d4h
kube-proxy     4         4         4       4            4           kubernetes.io/os=linux   4d4h
nodelocaldns   4         4         4       4            4           kubernetes.io/os=linux   4d4h

#change rr to nq
kubectl edit cm -n kube-system  kube-proxy
configmap/kube-proxy edited

#validate the changes
kubectl get cm -n kube-system  kube-proxy -o jsonpath='{.data.config\.conf}{"\n"}' |grep -ozP '(?s)ipvs:.*?(?=kind:)'
ipvs:
  excludeCIDRs: []
  minSyncPeriod: 0s
  scheduler: nq   #<---this is changed to lc from rr
  strictARP: false
  syncPeriod: 30s
  tcpFinTimeout: 0s
  tcpTimeout: 0s
  udpTimeout: 0s
Step-6: Reload the Kube-proxy daemonset to let your changes reflect
kubectl rollout restart ds kube-proxy -n kube-system
daemonset.apps/kube-proxy restarted
Step-7: Simulate a TCP flood on one of the worker nodes where web server pod is running
We will create a TCP flood to overwhelm a worker node where one replica of the webserver deployment is running and notice the behavior. To create the flood, we will use hping3 tool from the ubuntu pod, which we used earlier for running curl. For example, here, we are using the development-kube-worker-1 IP address. We will need Two windows to do this test.
Alternatively, Note that you can also do a simple node shutdown to see the behavior.
#on first window
date;hping3 -i u1 -S -p 80  10.233.102.226
Fri Jul 29 22:00:12 CDT 2022
HPING 10.233.102.226 (eth0 10.233.102.226): S set, 40 headers + 0 data bytes
From the 2nd window, you will notice that after around 22:00:12, , the connection frequency to development-kube-worker-1 node is reduced. The point here is that the connection requests are not dumb(aka round robin)
root@ubuntu:/# while true; do printf "$(date) ";  curl webserver.default.svc;sleep 1 ;done
Fri Jul 29 22:00:36 CDT 2022 POD_NAME: webserver-6958558dd8-k2mp5, POD_IP: 10.233.114.143,        NODE_NAME: development-kube-worker-3
Fri Jul 29 22:00:37 CDT 2022 POD_NAME: webserver-6958558dd8-t2qw9, POD_IP: 10.233.83.217,         NODE_NAME: development-kube-worker-2
Fri Jul 29 22:00:39 CDT 2022 POD_NAME: webserver-6958558dd8-k2mp5, POD_IP: 10.233.114.143,        NODE_NAME: development-kube-worker-3
Fri Jul 29 22:00:40 CDT 2022 POD_NAME: webserver-6958558dd8-t2qw9, POD_IP: 10.233.83.217,         NODE_NAME: development-kube-worker-2
Fri Jul 29 22:00:48 CDT 2022 POD_NAME: webserver-6958558dd8-t2qw9, POD_IP: 10.233.83.217,         NODE_NAME: development-kube-worker-2
Fri Jul 29 22:00:50 CDT 2022 POD_NAME: webserver-6958558dd8-t2qw9, POD_IP: 10.233.83.217,         NODE_NAME: development-kube-worker-2
Fri Jul 29 22:00:52 CDT 2022 POD_NAME: webserver-6958558dd8-t2qw9, POD_IP: 10.233.83.217,         NODE_NAME: development-kube-worker-2
Fri Jul 29 22:00:53 CDT 2022 POD_NAME: webserver-6958558dd8-k2mp5, POD_IP: 10.233.114.143,        NODE_NAME: development-kube-worker-3
Fri Jul 29 22:00:54 CDT 2022 POD_NAME: webserver-6958558dd8-r66xl, POD_IP: 10.233.102.226,        NODE_NAME: development-kube-worker-1
Fri Jul 29 22:00:55 CDT 2022 POD_NAME: webserver-6958558dd8-t2qw9, POD_IP: 10.233.83.217,         NODE_NAME: development-kube-worker-2
Fri Jul 29 22:00:56 CDT 2022 POD_NAME: webserver-6958558dd8-k2mp5, POD_IP: 10.233.114.143,        NODE_NAME: development-kube-worker-3
Summary:
This post shows us the steps to change the load balancing algorithms from round-robin to other algorithms for the Kubernetes services. However, they are still not granular enough to distribute the traffic by Percentage weight, for example:Replica-1: 50%
Replica-2: 25%
Replica-3: 25%
For percentage weight distribution in Kubernetes, there are solutions like istio are needed to extend the out-of-the-box Kubernetes.