This post will cover a basic example of canary deployment using istio in the Kubernetes cluster. In canary deployment, the software update is rolled out to a small portion of the users, so the developers can analyze the performance and work on the provided feedback without impacting all the users. Once the developers are happy with the rolled-out update, the new update will be made available to all the users gradually.
In Kubernetes, the canary deployment can be done using the following methods two methods. Therefore, I have divided this post into two parts. I assume you have a Kubernetes cluster available with Istio installed.
- PART-1: With plain Kubernetes(no Istio). Although, this method is not always suitable and provides less granular control.
- PART-2: Using Istio, with excellent granular control over the traffic.
- Part-1: Without Istio
- PART-2: With Istio
- Step-1: Create the 1st deployment with the old tested load.
- Step-2: Create the 2nd deployment with a new load
- Step-3: Create a service exposing both deployments under a single service.
- Step-4: Test the traffic distribution without the ISTIO components
- Step-5: Create a virtual service for webserver service
- Step-6: Create the destination rule for the service
- Step-7: Test the traffic distribution with the ISTIO components
- Summary
Part-1: Without Istio
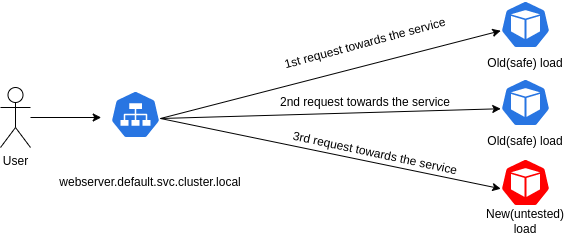
In Kubernetes, any service would default split the traffic to its endpoints(pods) in a round-robin algorithm. So, if we have three pods exposed via a service, two running a tested load, and one running a new load, then the risk of disruption is limited to 1/3rd of the requests sent to the service. We can see the last statement in action; let’s assume we have a webserver application requiring a canary release to test the new software updates. We can create two deployments in the default namespace.
– 1st deployment with old (already tested) load with two replicas.
– 2nd deployment with new load with one replica.
Now, expose the two deployments via a service called webserver. The setup would look like the below image.
Example:
step-1: Create the first deployment with the already tested load.
apiVersion: apps/v1
kind: Deployment
metadata:
  labels:
    app: webserver
  name: tested-load
spec:
  replicas: 2
  selector:
    matchLabels:
      app: webserver
  template:
    metadata:
      labels:
        app: webserver
    spec:
      containers:
      - name: nginx
        image: nginx
        volumeMounts:
        - name: workdir
          mountPath: /usr/share/nginx/html

      initContainers:
      - name: install
        image: busybox:1.28
        env:
        - name: POD_NAME
          valueFrom:
            fieldRef:
              fieldPath: metadata.name
        command:
        - 'sh'
        - '-c'
        - 'printf "%-30s\n" "Tested load -> POD_NAME: $(POD_NAME)" > /work-dir/index.html'
        volumeMounts:
        - name: workdir
          mountPath: "/work-dir"
      volumes:
      - name: workdir
        emptyDir: {}
step-2: Create the 2nd deployment with a new load
apiVersion: apps/v1
kind: Deployment
metadata:
  labels:
    app: webserver
  name: new-untested
spec:
  replicas: 1
  selector:
    matchLabels:
      app: webserver
  template:
    metadata:
      labels:
        app: webserver
    spec:
      containers:
      - name: nginx
        image: nginx
        volumeMounts:
        - name: workdir
          mountPath: /usr/share/nginx/html

      initContainers:
      - name: install
        image: busybox:1.28
        env:
        - name: POD_NAME
          valueFrom:
            fieldRef:
              fieldPath: metadata.name
        command:
        - 'sh'
        - '-c'
        - 'printf "%-30s\n" "New load -> POD_NAME: $(POD_NAME)" > /work-dir/index.html'
        volumeMounts:
        - name: workdir
          mountPath: "/work-dir"
      volumes:
      - name: workdir
        emptyDir: {}
step-3: expose the above two deployments using a single service
apiVersion: v1
kind: Service
metadata:
  name: webserver
  namespace: default
spec:
  selector:
    app: webserver
  ports:
    - protocol: TCP
      port: 80
      name: http
Now, we have a service called webserver.default.svc.cluster.local exposing the two deployments. This is done using the labels and selectors “app: webserver”; this label is present in both deployments, and the same selector is present In the service.
Step-4: Time to test
Note that I am running the curl command from within a pod(named consumer) in the same namespace to simulate the cluster’s internal traffic.
Currently, the service webserver.default.svc.cluster.local is cluster IP so its only accessible inside the cluster; however, if the service type is NodePort or Loadbalancer, then I am still required to use the curl command from within the pod to simulate internal traffic. To achieve traffic splitting for external traffic, another Istio object called Istio Gateway is required. We have not covered Istio Gateway in this post.
# create a pod in the same namespace for doing curl, I named it consumer
kubectl run consumer --image curlimages/curl --command sleep infinity

# the following for-loop would run 100 times and curl to webserver.default.svc in each iteration. The awk is just for doing counting, you can remove it if you want to visually inspect.
for i in {1..100}; do
    kubectl exec -it consumer  -- curl webserver.default.svc ;
 done |awk 'BEGIN{n=t=0}/New load/{n++;next}/Tested load/{t++}END{print "New load hits:", n,"Tested load hits:",t}'
The output of the above loop is the following; you can notice that 1/3rd of the traffic is going toward the new load, and 2/3 is still going to the old load. So, we can safely test the new load with 1/3rd of the application user without disrupting 2/3 of the users. This is done with plain Kubernetes, as by default, any service will send the traffic to its endpoints(pods) in a round-robin algorithm.
New load hits: 31 Tested load hits: 69
Problem:
What if, unlike the above example, you need to only expose 1% of your traffic for canary deployment? You will have to create 99 pods with the old load and 1 pod with the new load(canary). Meaning this option is only suitable for small-scale applications running a significantly less number of replicas. This can be better handled using Istio’s virtual service.
PART-2: With Istio
As seen in the above examples, there is significantly less flexibility while doing a canary release with plain Kubernetes. In this part, we will see how to use virtual service and destination rules to split the traffic granularly for a canary deployment.
Both virtual services and destination rules are the custom resources provided by Istio; you can find their official definition in the official documentation. First, however, here is how I imagine them.
Virtual Service is a piece of software running at the data plane(Envoy proxy) that provide very powerful and flexible routing rules.
Only after the virtual service does routing the destination rules provide policies that apply to the traffic toward its endpoints. Examples are load balancing, versioning, etc.
Step-1: Create the 1st deployment with the old tested load.
apiVersion: apps/v1
kind: Deployment
metadata:
  labels:
    app: webserver
  name: tested-load
spec:
  replicas: 2
  selector:
    matchLabels:
      app: webserver
  template:
    metadata:
      labels:
        app: webserver
        version: v1
    spec:
      containers:
      - name: nginx
        image: nginx
        volumeMounts:
        - name: workdir
          mountPath: /usr/share/nginx/html

      initContainers:
      - name: install
        image: busybox:1.28
        env:
        - name: POD_NAME
          valueFrom:
            fieldRef:
              fieldPath: metadata.name
        command:
        - 'sh'
        - '-c'
        - 'printf "%-30s\n" "Tested load -> POD_NAME: $(POD_NAME)" > /work-dir/index.html'
        volumeMounts:
        - name: workdir
          mountPath: "/work-dir"
      #dnsPolicy: Default
      volumes:
      - name: workdir
        emptyDir: {}
Step-2: Create the 2nd deployment with a new load
apiVersion: apps/v1
kind: Deployment
metadata:
  labels:
    app: webserver
  name: new-untested
spec:
  replicas: 1
  selector:
    matchLabels:
      app: webserver
  template:
    metadata:
      labels:
        app: webserver
        version: v2
    spec:
      containers:
      - name: nginx
        image: nginx
        volumeMounts:
        - name: workdir
          mountPath: /usr/share/nginx/html

      initContainers:
      - name: install
        image: busybox:1.28
        env:
        - name: POD_NAME
          valueFrom:
            fieldRef:
              fieldPath: metadata.name
        command:
        - 'sh'
        - '-c'
        - 'printf "%-30s\n" "New load -> POD_NAME: $(POD_NAME)" > /work-dir/index.html'
        volumeMounts:
        - name: workdir
          mountPath: "/work-dir"
      #dnsPolicy: Default
      volumes:
      - name: workdir
        emptyDir: {}
Verify the two deployment and their pods. Notice that I have used the label version == v1 for the old load and version == v2 for a new load.
kubectl get deployments.apps
NAME           READY   UP-TO-DATE   AVAILABLE   AGE
new-untested   1/1     1            1           91m
tested-load    2/2     2            2           92m


kubectl get pods -L version
NAME                           READY   STATUS    RESTARTS       AGE     VERSION
new-untested-7f4588f8d-c29q7   2/2     Running   0              91m     v2
tested-load-5db5c488f6-nzffc   2/2     Running   0              91m     v1
tested-load-5db5c488f6-whpx9   2/2     Running   0              91m     v1
Step-3: Create a service exposing both deployments under a single service.
apiVersion: v1
kind: Service
metadata:
  name: webserver
spec:
  selector:
    app: webserver
  ports:
    - protocol: TCP
      port: 80
      name: http
Step-4: Test the traffic distribution without the ISTIO components
# create a pod in the same namespace for doing curl, I named it consumer
kubectl run consumer --image curlimages/curl --command sleep infinity
# the following for-loop would run 100 times and curl to webserver.default.svc in each iteration. The awk is just for doing counting, you can remove it if you want to visually inspect.
for i in {1..100}; do
kubectl exec -it consumer -- curl webserver.default.svc ;
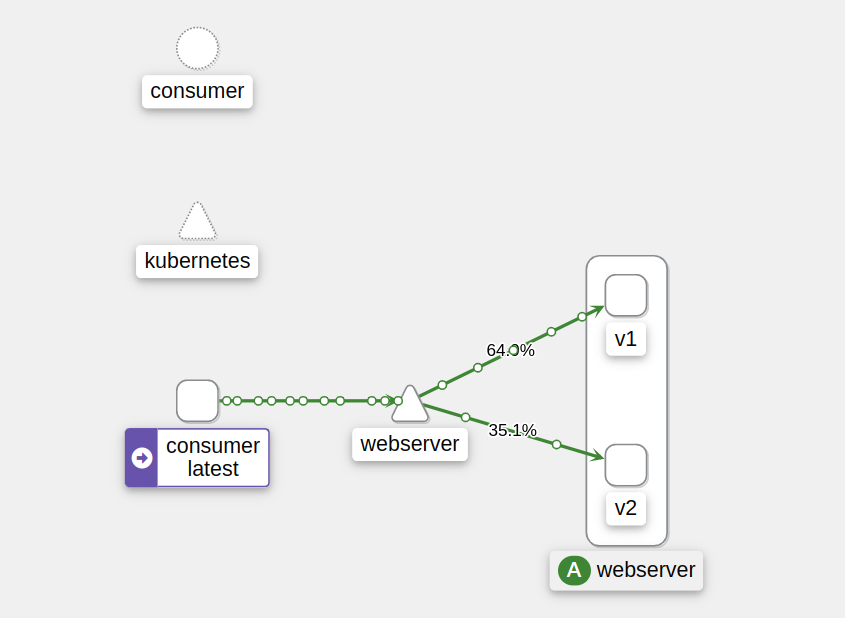
done |awk 'BEGIN{n=t=0}/New load/{n++;next}/Tested load/{t++}END{print "New load hits:", n,"Tested load hits:",t}'New load hits: 35 Tested load hits: 65
The same is visible using Kiali dashboard; the webserver application consists of two deployments, with 1st deployment having 2 replicas and 2nd deployment running with 1 replica. So, as per the round-robin algorithm, the traffic is distributed evenly among the replicas(3).
Step-5: Create a virtual service for webserver service
The crux of the below YAML is, When any request is incoming for webserver.default.svc.cluster.local If the traffic is HTTP, route the traffic to the destinations as per their assigned weights. The destination could be the same service or any different service.
apiVersion: networking.istio.io/v1alpha3
kind: VirtualService
metadata:
  name: sample-vs
  namespace: default
spec:
  hosts:
  - webserver.default.svc.cluster.local
  http:
  - route:
    - destination:
        host: webserver.default.svc.cluster.local
        subset: v1
      weight: 1
    - destination:
        host: webserver.default.svc.cluster.local
        subset: v2
      weight: 99
Step-6: Create the destination rule for the service
The crux of the following YAML is that after the routing rules of the virtual service are evaluated, the service’s(host field below) endpoints are divided into two subsets; the name of the 1st subset is v1 and v2 for others. The virtual service above uses these subsets to do the weighted traffic splitting.
apiVersion: networking.istio.io/v1alpha3
kind: DestinationRule
metadata:
  name: sample-destination-rule
  namespace: default
spec:
  host: webserver.default.svc.cluster.local
  subsets:
  - labels:
      version: v1
    name: v1
  - labels:
      version: v2
    name: v2
Step-7: Test the traffic distribution with the ISTIO components
# create a pod in the same namespace for doing curl, I named it consumer
kubectl run consumer --image curlimages/curl --command sleep infinity
# the following for-loop would run 100 times and curl to webserver.default.svc in each iteration. The awk is just for doing counting, you can remove it if you want to visually inspect.
for i in {1..100}; do
kubectl exec -it consumer -- curl webserver.default.svc ;
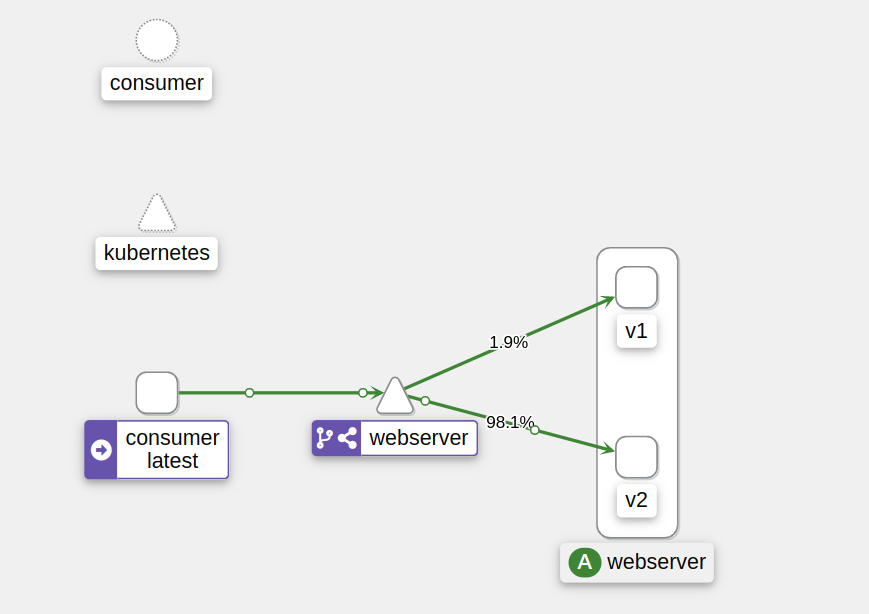
done |awk 'BEGIN{n=t=0}/New load/{n++;next}/Tested load/{t++}END{print "New load hits:", n,"Tested load hits:",t}'New load hits: 99 Tested load hits: 1
The same validation can be done using kiali dashboard:
Summary
We have seen that canary deployment is possible without Istio; however, it’s helpful only for very limited cases. With Istio, a great degree of granularity is possible.