This post is will provide steps to add a new node to the Kubernetes cluster using Kubespray. The below snippet shows the existing node in the cluster, note that I have one master and two worker nodes.
kubectl get node -o wide
NAME            STATUS ROLES               AGE VERSION INTERNAL-IP EXTERNAL-IP OS-IMAGE KERNEL-VERSION CONTAINER-RUNTIME
kube-master     Ready control-plane,master 44d v1.23.3 192.168.1.132 <none> Ubuntu 20.04.3 LTS 5.4.0-105-generic containerd://1.5.9
kube-worker-1   Ready <none>               44d v1.23.3 192.168.1.133 <none> Ubuntu 20.04.3 LTS 5.4.0-105-generic containerd://1.5.9
kube-worker-2   Ready <none>               44d v1.23.3 192.168.1.134 <none> Ubuntu 20.04.3 LTS 5.4.0-105-generic containerd://1.5.9
Now I have spawned a new Virtual Machine(NODE) with the IP as 192.168.1.140. Obviously there is no node with that IP present in the above snippet as the node is not yet added to the cluster.
Two Important pre-requisite for before using Kubespray:
- New node is password-less accessible from ansible-controller node via ssh-keys. This can be skipped if –ask-ssh-pass flag is used with the kubespray, but the recommendation is to add ssh-keys.
- Sudo permissions are setup properly to run administrative commands via ansible_user during playbook execution.
For sake of completion, here are the steps to add ssh-keys to the new node and sudo permissions.
To setup the SSH-keys:
user@ansible-controller:~$ ssh-keygen -t ed25519Transfer the Keys to the new host:
user@ansible-controller:~$ ssh-copy-id [email protected]
To setup the sudo permissions for password-less sudo:
SSH into the new VM and switch to the root user and type “visudo” to open /etc/sudoers file for editing. Once the file is open add the line in RED at the same location as provided in below snippet. Note that, you would have to replace the string ‘user’ with your ansible user name.
user@kube-worker-3:~$ sudo -i
[sudo] password for user:
root@kube-worker-3:~# visudo
Make the following changes in the file:
# Allow members of group sudo to execute any command
%sudo ALL=(ALL:ALL) ALL
user ALL=(ALL) NOPASSWD: ALL
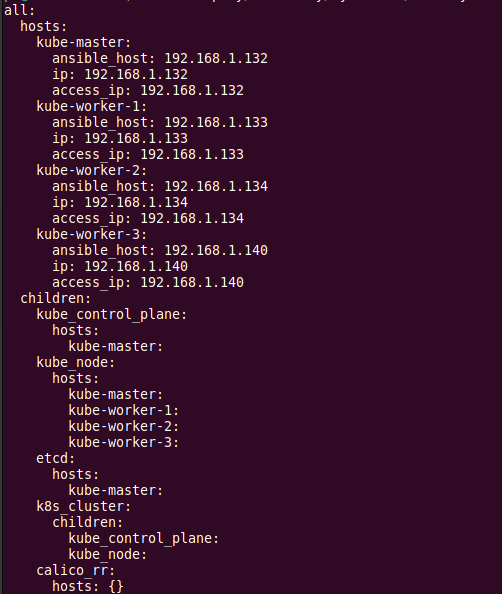
Now add the new VM IP in the inventory file. Following is my new inventory file.

Here is the side-by-side diff of the changes in the inventory file. NEW vs OLD.

Once the changes in the inventory is done, the final step is to trigger the cluster.yml playbook with limiting it to the new node. This limiting is enabled by use of –limit flag.
ansible-playbook -i inventory/mycluster/hosts.yaml cluster.yml -u ps --become --limit kube-worker-3
After the playbook execution is complete, the new node will automatically join the cluster.
kubectl get node -owide
NAME           STATUS   ROLES               AGE VERSION INTERNAL-IP EXTERNAL-IP OS-IMAGE KERNEL-VERSION CONTAINER-RUNTIME
kube-master   Ready    control-plane,master 44d v1.23.3 192.168.1.132 <none> Ubuntu 20.04.3 LTS 5.4.0-105-generic containerd://1.5.9
kube-worker-1 Ready    <none>               44d v1.23.3 192.168.1.133 <none> Ubuntu 20.04.3 LTS 5.4.0-105-generic containerd://1.5.9
kube-worker-2 Ready    <none>               44d v1.23.3 192.168.1.134 <none> Ubuntu 20.04.3 LTS 5.4.0-105-generic containerd://1.5.9
kube-worker-3 NotReady <none>               85s v1.23.3 192.168.1.140 <none> Ubuntu 20.04.3 LTS 5.4.0-105-generic containerd://1.5.9
If the new node(kube-worker-3) is not in ready state, SSH into the node and issue reboot.
user@kube-worker-3:~$ sudo reboot
Connection to 192.168.1.140 closed by remote host.
Connection to 192.168.1.140 closed.
user@controller:~/kubespray$
After the reboot, the new node is in ready state.
k get node -owide
NAME STATUS ROLES AGE VERSION INTERNAL-IP EXTERNAL-IP OS-IMAGE KERNEL-VERSION CONTAINER-RUNTIME
kube-master Ready control-plane,master 44d v1.23.3 192.168.1.132 <none> Ubuntu 20.04.3 LTS 5.4.0-105-generic containerd://1.5.9
kube-worker-1 Ready <none> 44d v1.23.3 192.168.1.133 <none> Ubuntu 20.04.3 LTS 5.4.0-105-generic containerd://1.5.9
kube-worker-2 Ready <none> 44d v1.23.3 192.168.1.134 <none> Ubuntu 20.04.3 LTS 5.4.0-105-generic containerd://1.5.9
kube-worker-3 Ready <none> 4m47s v1.23.3 192.168.1.140 <none> Ubuntu 20.04.3 LTS 5.4.0-105-generic containerd://1.5.9
